EMS
| Català | Castellano | English |
Attendance Reports
Attendance → Reports opens the Attendance reports screen: a pivot table you can explore and export yourself, plus 3 printable PDF reports (by group, by student, by subject) reachable from its header.
Required role: Teacher
Exploring Attendance Reports
- Navigate to Attendance → Reports. It opens directly on a pivot table with the My subjects filter on, showing only your own groups and subjects. If you are a group tutor, removing that filter also shows your tutees in every subject (see the tutors manual).
-
The table groups by subject, then student. Click the Expand all icon (top-right, next to Flip axis) twice: once to unfold the subjects, once more to unfold each subject’s students. The main number is the % of absences per student — Count (number of sessions counted) and Strike count are shown alongside it, so you can tell whether a 33% comes from 3 sessions or from 30, and whether it comes with disciplinary strikes attached. A subject your schedule splits into parts taught apart (its topic, e.g. the Physical Education of a CFGB module) is listed as a subject of its own, as “Subject - Topic”.
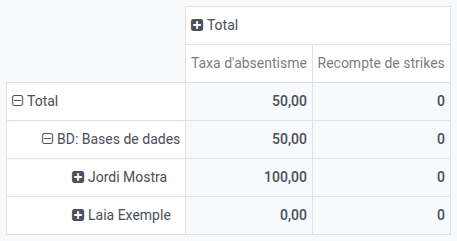
- Use the search bar to filter further (by student, group, subject or status), and Group By to change how the table is folded. The group is the student’s own group on the date of each session: a session shared by several groups counts each student only in their own group.
- Use the spreadsheet/download icon in the header to export the current pivot to Excel.
- Switch to the graph view (top-right icons) for a visual breakdown — by default it shows the % of absence per subject, so you can spot which subjects have the highest absenteeism at a glance. The graph shows one measure at a time — use the Measures dropdown in its header to switch to Strike count if you want to see disciplinary strikes per subject instead.
From a Student’s File
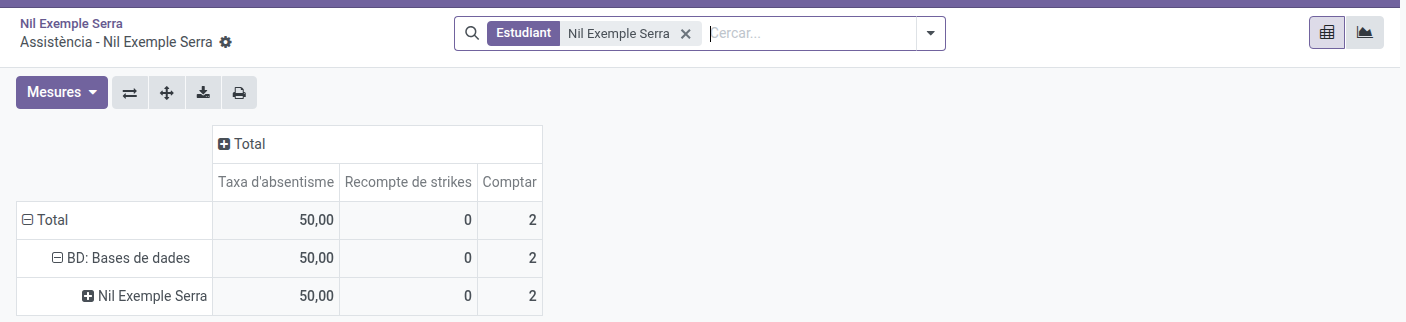
To look at a single student’s attendance, open their file and click the Attendance button at the top, next to Meetings and Relations. It opens the same pivot table, already filtered on that student (the Student filter in the search bar, which you can remove with its ×). You’ll see the subjects you teach that student (all of them, if you’re also their tutor). The graph view and the PDF reports work exactly as described in this manual.

Printing a PDF Report
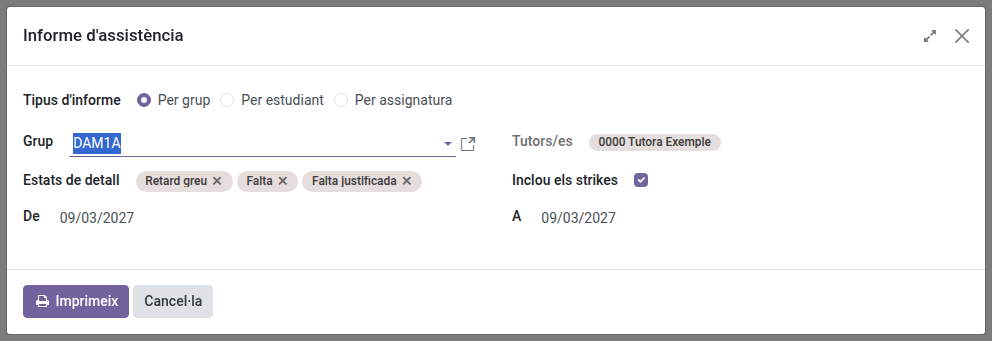
On the Attendance reports screen, click the printer button, the last one in the row above the table (next to the download one), also in the graph view. It’s also in the ⚙ (gear) menu, as Print attendance report. If the table is filtered on a student, a group or a subject (in the search bar), the form opens on that report with it already selected: from a student’s file, for instance, it’s that student’s report. In the form, pick the Report type — by group, by student, or by subject — and the fields adapt to your choice. The lists offer exactly the students, groups and subjects you see on the pivot table (current course only), and the PDF covers the same sessions as the table.
Attendance report (by group):
- Pick a Group — the dropdown shows the groups of the students you’ve taken the roll-call of in your subjects. A roll-call taken on guard duty belongs to the subject’s own teacher, not to you.
- The Tutor and the From/To dates fill in automatically from the group and its full session range.
- Click Print. The PDF opens with an overall assistance/absence breakdown, a per-status count, and any session notes recorded for the period. It covers the group’s students, in the group each one belonged to on the date of each session.
Attendance report (by student):
- Pick a Student — the dropdown shows the students you’ve taken the roll-call of in your subjects.
- The Tutor and the From/To dates fill in automatically from the student and their full session range.
- Click Print. The PDF opens with an overall assistance/absence breakdown, a per-status count, and any session notes recorded for the period. It only includes the subjects you teach that student, including a roll-call a colleague took on guard duty in your subject (one you took on guard duty in someone else’s subject is theirs). If you are the student’s tutor, it includes every subject instead (see the tutors’ manual).
Attendance report (by subject):
- Pick a Subject — the dropdown shows the subjects you teach, each topic as a subject of its own.
- The Groups field fills in automatically with every group whose students have that subject, and Tutors shows their tutors for reference. If you only want some of those groups in the report, remove the others from the Groups field — it stays editable.
- The From/To dates fill in automatically to cover the full session range for your selection.
- Click Print. The PDF opens with an overall assistance/absence breakdown, a per-status count, and any session notes recorded for the period.
For any report type, two controls govern the per-line detail in the PDF:
- Detail statuses — which statuses appear in the “Details” tables. It defaults to absence-related statuses only (Miss, Justified Miss) so the report stays a manageable size; add more and a warning appears that the report may become slow to generate or fail for large selections.
- Include strikes (on by default) — adds tables of the disciplinary strikes recorded during the period.
The downloaded PDF is named after the report and the selected student, group or subject (e.g. Attendance report_ by student_Name_Surname.pdf), so several downloads can be told apart.