EMS
| Català | Castellano | English |
Subjects
Subjects are the individual course units that make up a Study (e.g., Programming, Databases). Each subject can belong to several studies, has its own learning outcomes and content, and is automatically billable through enrolments — the system creates and keeps in sync the underlying product used for invoicing, with no manual step required.
Required role: Administrator
Access
Navigate to: Educational Community → Configuration → Curriculum → Subjects
View All Subjects
Opening the menu shows a list of all subjects sorted by code. Each row shows the code, acronym, name and the studies it belongs to.
Create a Subject
- Click New.
- Fill in the required fields:
- Code (required): Official code. It only needs to be unique among subjects that share at least one study — the same code can be reused by a subject that belongs to a completely different study (e.g. the same official module code meaning different things, with different learning outcomes and hours, in two unrelated cycles). Saving fails with “duplicated code!” if the code is already used by another subject that shares a study with this one (or that has no study assigned yet).
- Acronym (required): Short code used across the system.
- Name (required): Full descriptive name.
- Optionally fill in:
- Internal hours / External hours (e.g., work-placement hours) — Total hours is calculated automatically.
- ECTS Credits.
- Tutorship: check if this subject is a tutoring slot.
- In the Studies tab, link the studies this subject belongs to.
- Use the Learning Outcome and Content tabs to build the subject’s curriculum breakdown.
- Optionally, add free-form notes in the Notes tab.
- Click Save (or use the breadcrumb to navigate away — Odoo saves automatically).
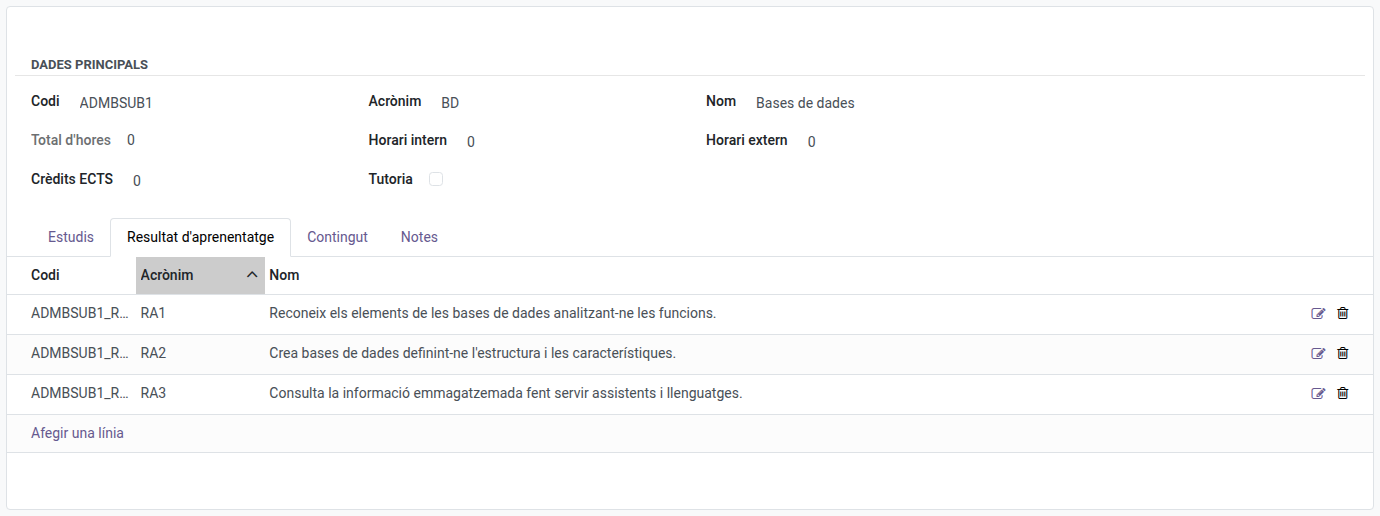
Adding Learning Outcomes
Learning outcomes only exist inside a subject — there is no separate “Outcomes” menu.
- Open a subject and go to the Learning Outcome tab.
- Click Add a line and fill in the code, acronym and name directly in the row.
- Code: must start with the subject’s own code (e.g. subject
CFGS_ICB0, outcomeCFGS_ICB0_RA1) — Odoo rejects a save otherwise.
- Code: must start with the subject’s own code (e.g. subject
- Click the pencil (Edit) icon on a row to open the outcome’s own form, where you can also manage its Evaluation criteria and add notes.
- Save the subject form to persist any changes made in the inline row.
Adding Evaluation Criteria
Evaluation criteria only exist inside a learning outcome — one level deeper than outcomes themselves.
- Open a subject, go to Learning Outcome, and open an outcome’s own form (pencil icon).
- In the outcome’s popup, go to the Evaluation criteria tab and click Add a line.
- Code: must start with the outcome’s own code, the same rule as outcomes-within-subjects.
- Click the pencil icon on a criteria row to open its own form and add notes.
- Save the outcome popup, then save the subject form.
Adding Content
Content items live in the Content tab, separate from Learning Outcome, and can themselves be nested (a content item can have “Composite” sub-items).
- Open a subject and go to the Content tab. Click Add a line to create a top-level content item (code, acronym, name).
- To add a sub-item under an existing content item: click its pencil (Edit) icon to open its own form, go to the Composite tab, and Add a line there.
- Code: a sub-item’s code must start with its direct parent’s code — top-level content items are not required to start with the subject’s code.
- Save the subject form (and any open popup) to persist changes.
Saving automatically creates a billing product behind the scenes so the subject can be included in enrolments. You don’t need to create or manage this product manually — it stays in sync whenever you rename the subject or change its code.
Edit a Subject
- Open the subject from the list.
- Click any field to edit it inline, or click Edit if required.
- Make your changes.
- Click Save.
Delete a Subject
- Select the subject in the list (tick the checkbox on the left).
- Click the Action menu (⚙) and select Delete.
- Confirm the deletion in the dialog.
Warning: A subject cannot be deleted if it has linked records elsewhere in the system (teaching assignments, grade sessions, planning…).