EMS
| Català | Castellano | English |
Guide to confirming the enrollment proposal
This guide explains, step by step, how families (or students) confirm the enrollment proposal that the school sends them by email, using the school’s education portal.
Index
- Before you start: the proposal email
- Step 1 — Accessing the portal and the Enrollment section
- Step 2 — Responding to the authorizations
- Step 3 — Reviewing the enrollment details
- Step 4 — (Optional) Sending a comment to the Secretary’s office
- Step 5 — Choosing the payment plan and method
- Step 6 — Registering the bank account (IBAN)
- Step 7 — Confirming the enrollment
- After confirming: following the payments
Before you start: the proposal email
When the enrollment proposal for the upcoming academic year is available, you will receive an email from the school (INS Puig Castellar) at the address you provided. The message informs you that the enrollment can now be processed and tells you the steps to follow.
To start the process, click the my enrollment link in the email, or access the school portal directly as explained in Step 1.
Note: to log in to the portal you need an activated account. If you have not activated it yet, please first check the Student portal access and activation guide.
Step 1 — Accessing the portal and the Enrollment section
Once you have logged in, you will land on the portal’s home page (My account). From the top menu or the central cards, click Enrollment and authorizations.
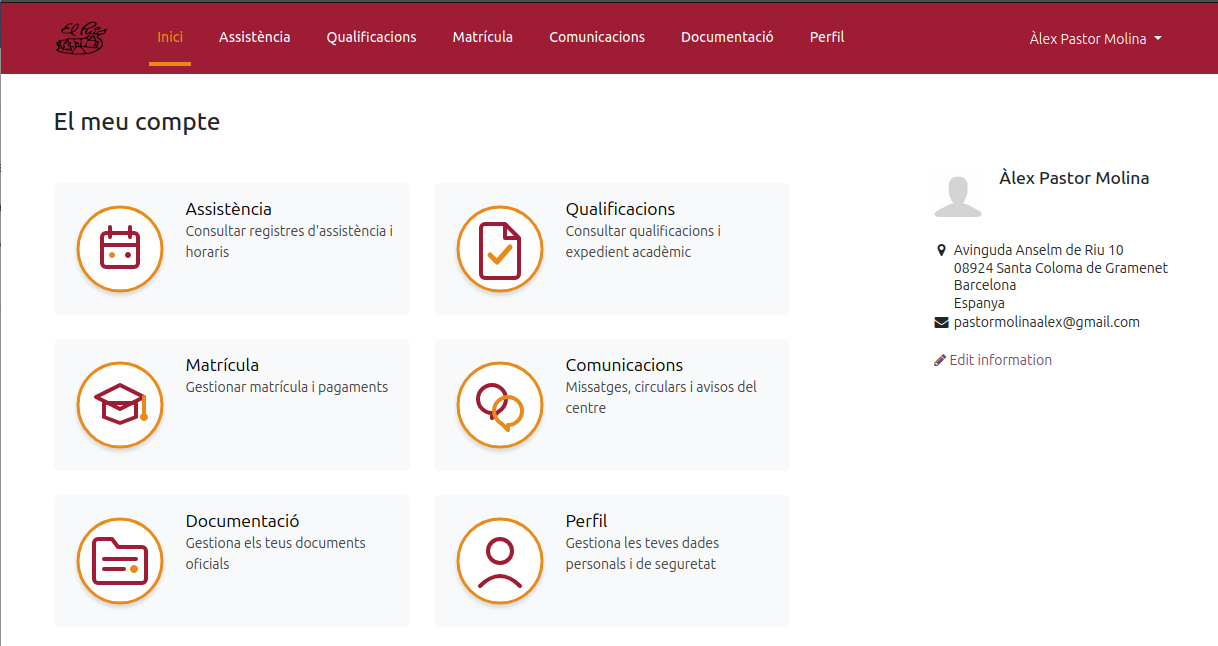
In the Enrollment section you will see the proposal the school has prepared for you, with all the sections to review and confirm.
If you do not see any proposal: if, when you open Enrollment, the message “No active enrollment process found” appears, it means you currently have no pending proposal (because it has not been sent to you yet). If in doubt, contact the school’s Secretary’s office.

Step 2 — Responding to the authorizations
The first section, 1. Authorizations, contains the documents and consents you must respond to before you can confirm the enrollment (image and sound use authorization, educational commitment agreement, data protection, etc.).
Each authorization appears with the Pending status. To respond to it, click the Answer button on the corresponding row (1).
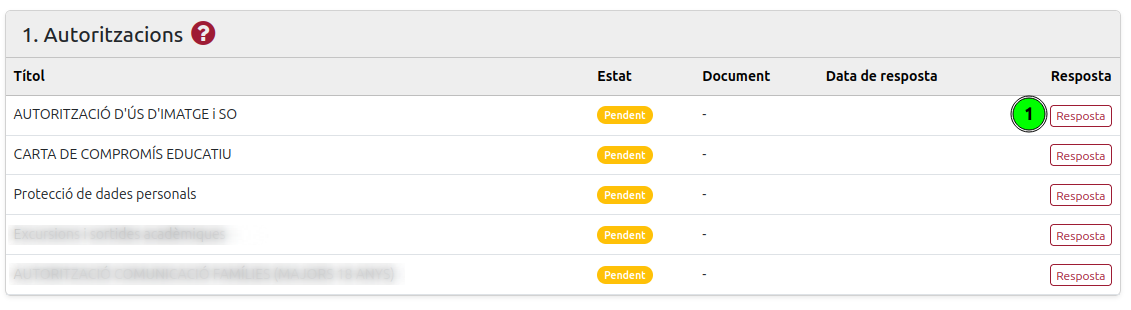
A window will open with the full text of the authorization. Read it carefully and, if applicable, fill in the requested fields (some are mandatory and are marked with an asterisk *). Then:
- Click Accept Authorization to give your consent.
- Click Reject if the authorization allows it and you do not wish to give consent.
Important: you must respond to all mandatory authorizations (they must end up in the Accepted status). While any mandatory authorization remains pending, the enrollment confirmation button will stay disabled.
Step 3 — Reviewing the enrollment details
In the 2. Enrollment details section you will find the breakdown of all the items (enrollment, PTA fee, fees, modules or subjects…) with their price and the total to pay.
Check that all the information is correct.
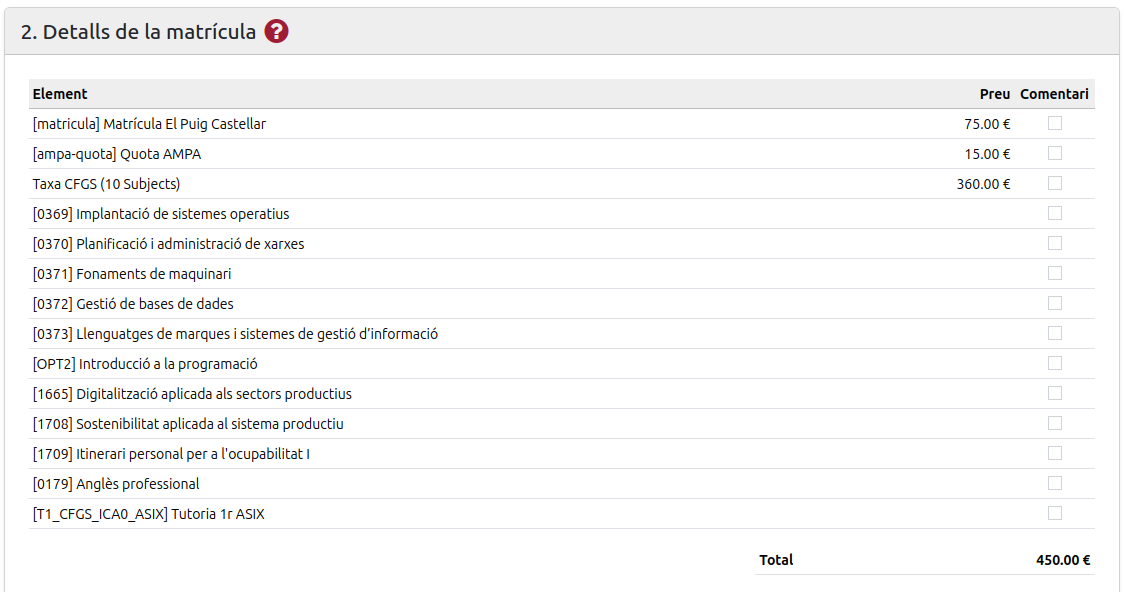
- If you agree with everything, you can continue with the payment (Step 5).
- If you have any questions or want to report an issue about an item, follow Step 4.
Step 4 — (Optional) Sending a comment to the Secretary’s office
If you want to ask about or comment on any of the items before confirming, you can send a message to the Secretary’s office from the portal itself:
- Tick the box (1) in the Comment column to the right of the line or lines you want to ask about.
- When you tick a box, the Comments box (2) will open, where you must write your question or remark.
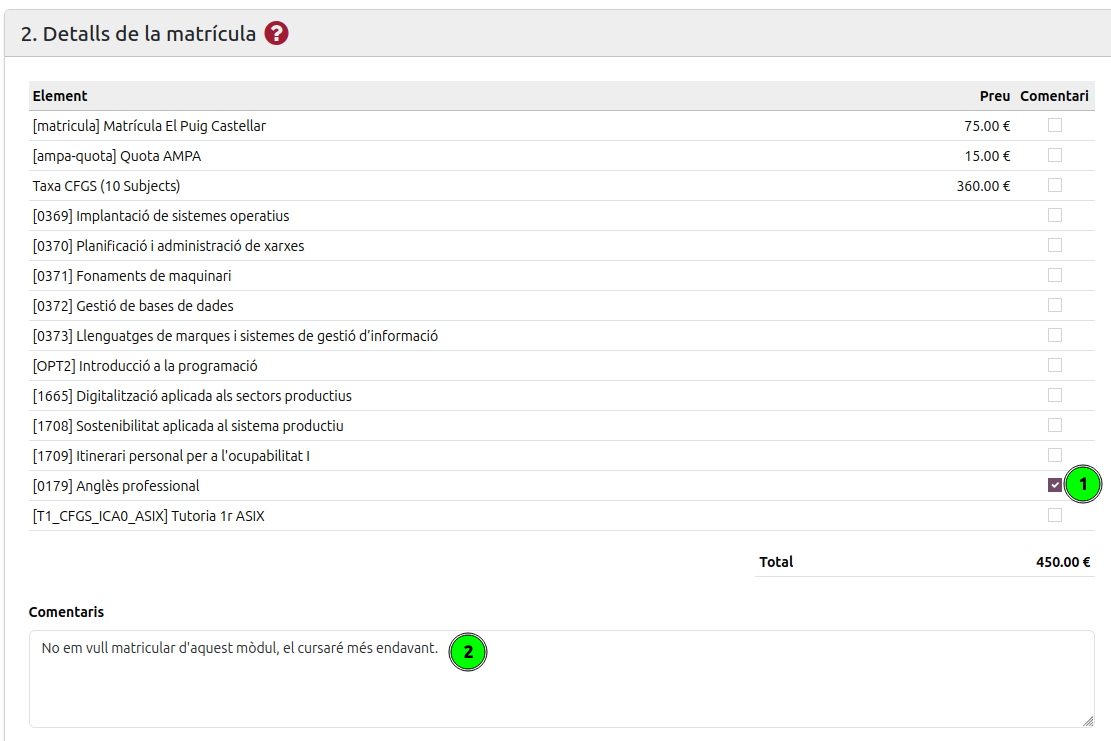
- When any line is ticked, the confirm button is replaced by the Comments for the secretary’s office button (3). Click it to send your query.

Please note that:
- Sending a comment does not confirm the enrollment: it only sends your query to the Secretary’s office.
- The Secretary’s office will review your message and reply. You will find the full message history in the 3. Enrollment Communications section, within the same enrollment page.
- Once the matter is resolved, you can come back and confirm the enrollment as usual.
Step 5 — Choosing the payment plan and method
At the bottom of the details section you must indicate how you want to pay the enrollment.
Payment plan. Choose one of the available options:
- Single payment (July).
- Payment in two installments (July and September). If you choose this option, the breakdown of the two payments will be shown.
The Payment in two installments option is only available if the enrollment includes Fees (CFGS). Fees are the only enrollment item that can be split into two payments.
Payment method. The school uses direct debit. To be able to select this option you need a registered bank account (IBAN). If you have not registered one yet, you will see a warning like the one in the image, prompting you to submit your IBAN before continuing (see Step 6).
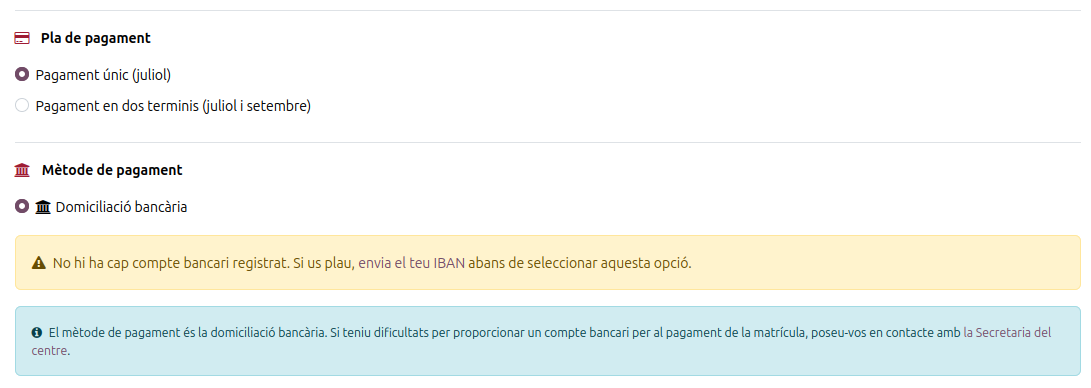
If you have difficulties providing a bank account, contact the school’s Secretary’s office.
Step 6 — Registering the bank account (IBAN)
To register the bank account, go to the Documentation section in the top menu. In the Bank account (IBAN) section, fill in the Update bank account form:
- The account IBAN.
- Account holder (full name).
- Expiry date (optional).
Then click Submit.
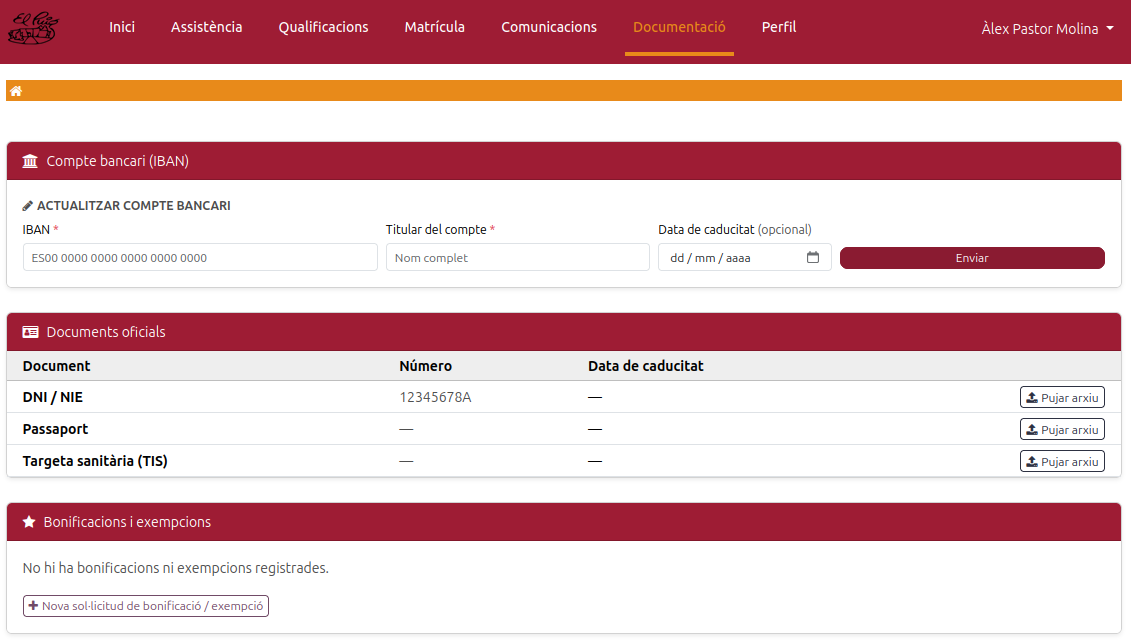
If you already had an account registered from another year, in this same section you can:
- Renew current account (1) — if you want to keep the same account and update its validity.
- Update bank account (2) — if you want to enter a new account (fill in the details and click Submit).
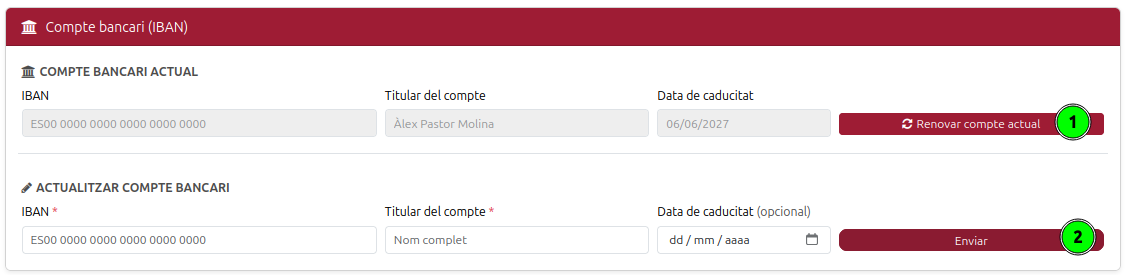
Once the IBAN is registered, go back to the Enrollment section to complete the process.
Step 7 — Confirming the enrollment
Back in Enrollment, check that everything is correct:
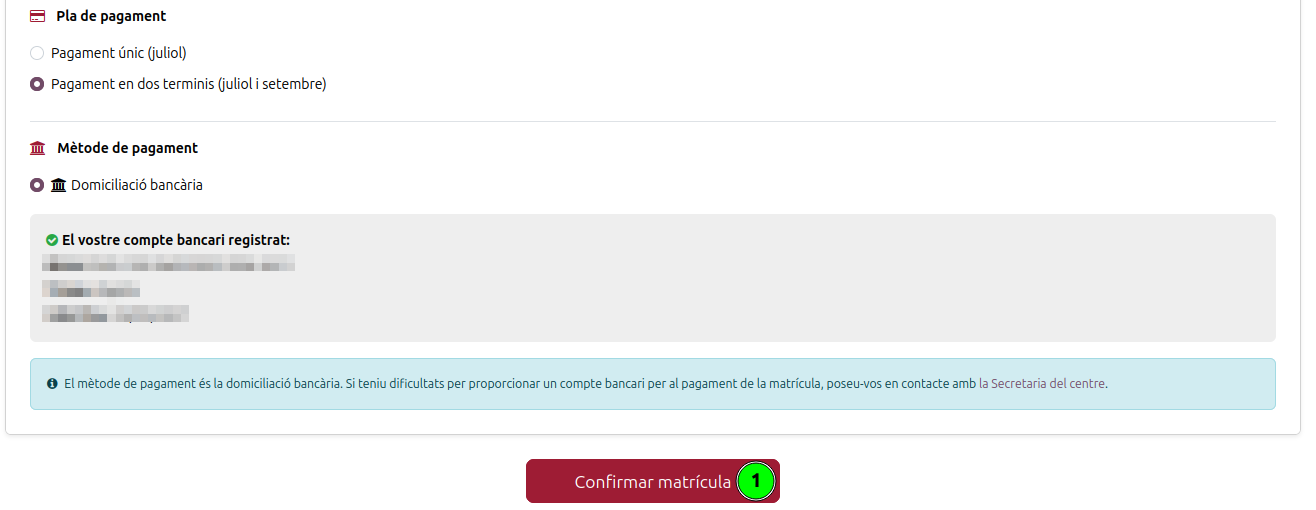
- The chosen payment plan (1).
- The registered bank account, which now appears confirmed with the IBAN, the holder and the validity (2).
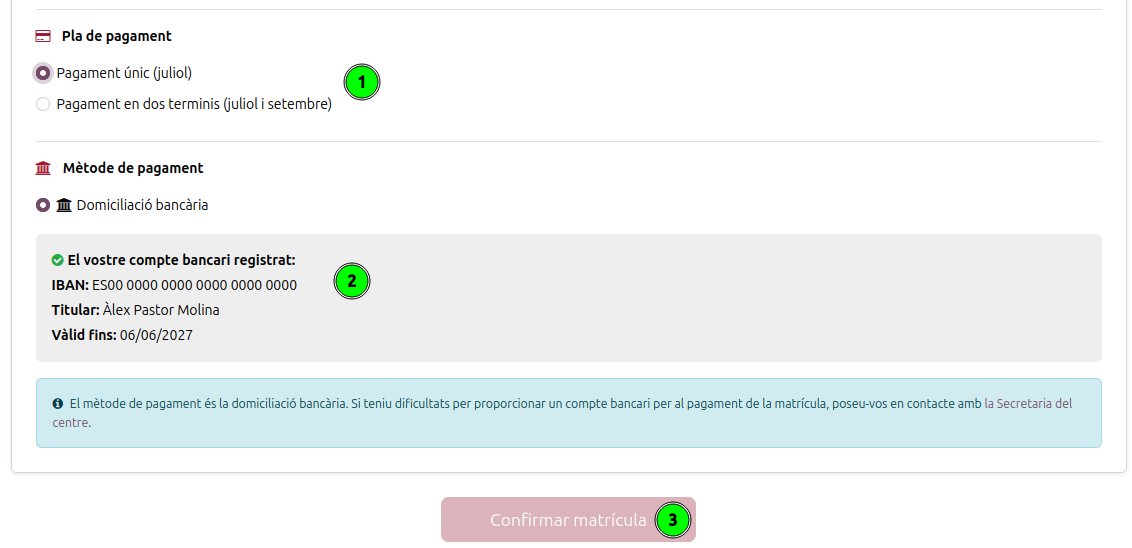
Bonifications and exemptions (enrollments with Fees, CFGS): if you are entitled to a bonification (general large or single-parent family, scholarship) or an exemption (special large or single-parent family, disability…) that is not yet reflected in the amounts, upload the supporting document in the Documentation section and wait until the Secretary’s office approves it before confirming your enrollment. Bonifications or exemptions approved after confirmation are not applied automatically: you will need to contact the school Secretary’s office so they apply them and regenerate the invoice.
The Confirm Enrollment button (3) stays disabled (light colour) until all of these conditions are met:
- All mandatory authorizations are accepted.
- You have selected a payment plan.
- You have a valid bank account (IBAN) registered.
When all of them are met, the Confirm Enrollment button becomes active (maroon colour). Click it to complete the process.
Once confirmed, the enrollment is registered and the page switches to read-only mode, showing the enrollment information. If you later need to make any change, you will have to contact the school’s Secretary’s office.
After confirming: following the payments
Once the school issues the enrollment invoice, the Enrollment section shows a payment schedule inside the Payment block, with one row per installment. Each row shows:
- Which installment it is (Single payment, or Payment 1 of 2 and Payment 2 of 2) and its due date.
- The amount.
- Its status: Paid (green) or Pending (yellow).
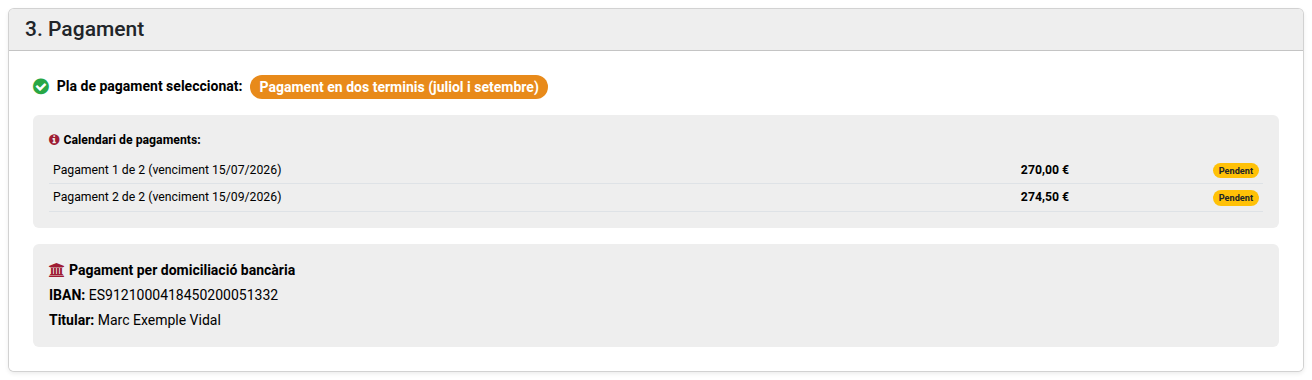
With a two-installment plan, the first one can read Paid while the second stays Pending until the September collection.
Once the school registers the payment, the installment turns to Paid:
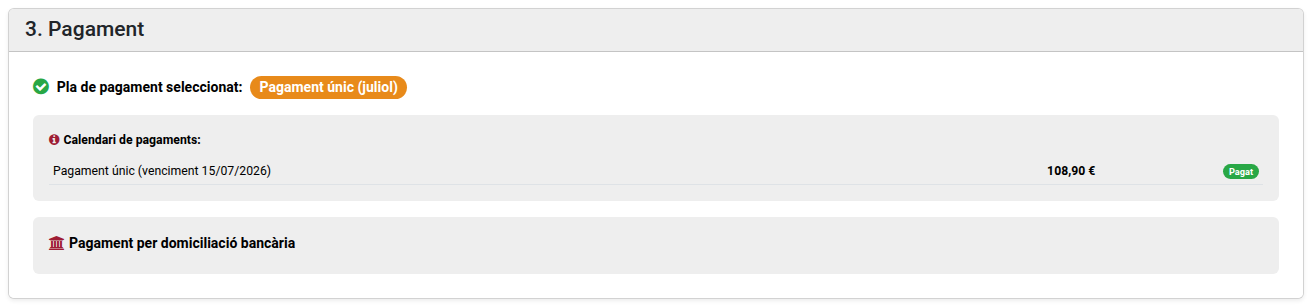
When the school registers the payment of an installment, you also get a notice in the portal, both in the Communications block of the enrollment page itself and in the Communications section of the main menu. The notice states which installment was collected, the amount and the due date.
Installments are updated when the school registers the payment in its system, not at the exact moment of the bank charge: a few days may pass between the two. If an installment is still Pending well after its due date, contact the school’s Secretary’s office.