EMS
| Català | Castellano | English |
Onboarding a Teacher and Creating Their Corporate Email Account (Google Workspace)
This guide explains how to onboard a teacher or ASP (Administrative and Services Personnel) staff member, and how their corporate Google Workspace email account is created automatically.
Required role: Administrator or Human Resources
Index
- Access
- Step 1 — Create the Teacher Record
- Step 2 — Fill in the Basic Data
- Step 3 — Fill in the Private Email
- What Happens Next
- Special Cases
Access
Educational Community → Teachers
Step 1 — Create the Teacher Record
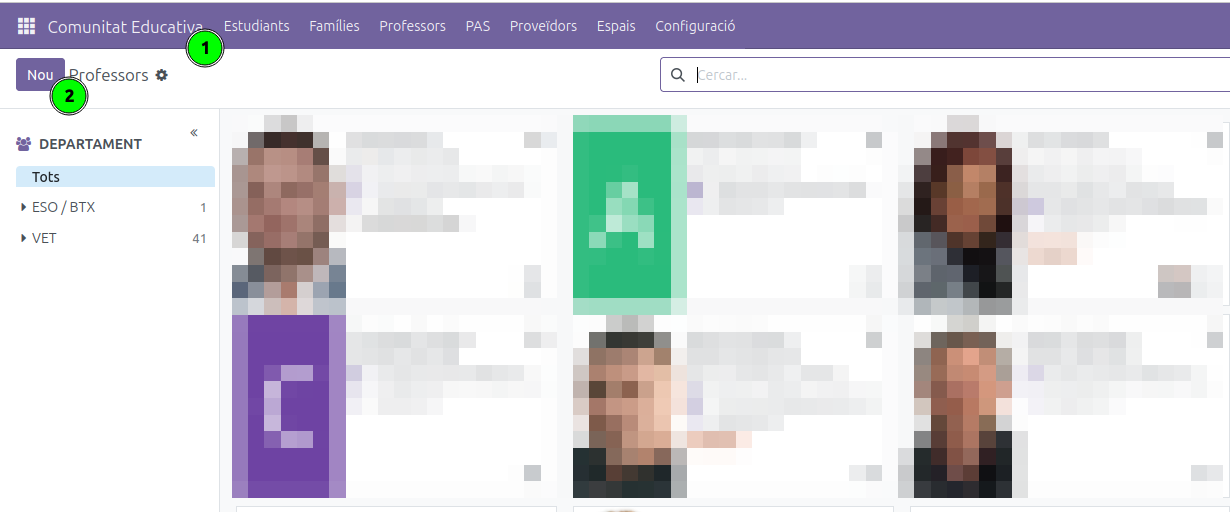
In the top menu, click Teachers (1) and then the New (2) button to open the onboarding form.
Step 2 — Fill in the Basic Data
On the onboarding form:
- Enter the Teacher’s Name (1).
- Fill in the job details under Department / Job Position (2).
- Optionally, provide a Suggested Google username (3): only the part before the domain (e.g.
jdoe), shown next to@elpuig.xeill.net. If left blank, the system will generate one automatically from the name.
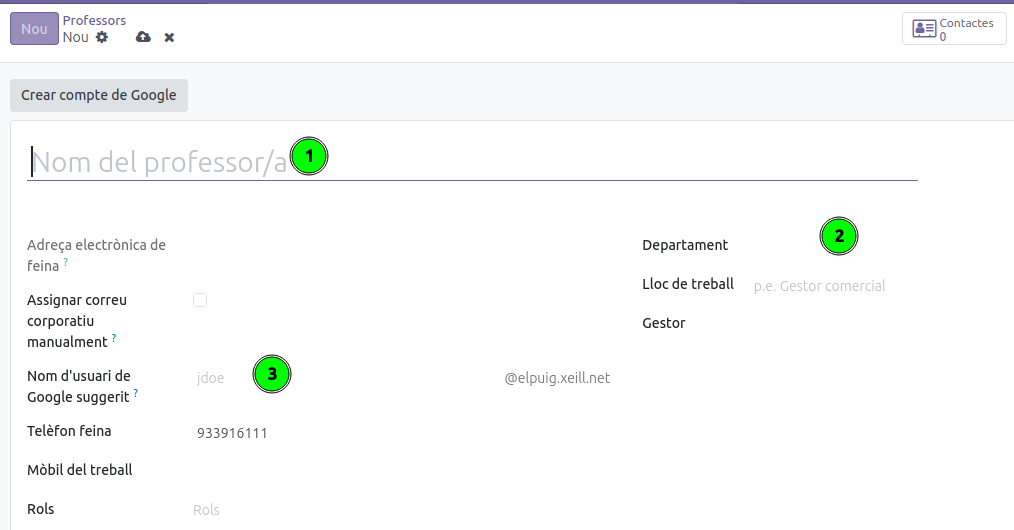
The Work Email field is shown greyed out (read-only): it is the corporate email that will be generated automatically (see What Happens Next).
Step 3 — Fill in the Private Email
Fill in the Private Email field (1), in the right-hand column of the main screen, under Manager (the same field is also in the Private Information tab). This personal email address is where the password for the new corporate email will be sent. It must be a genuinely personal address: EMS won’t accept one of the centre’s own domain.
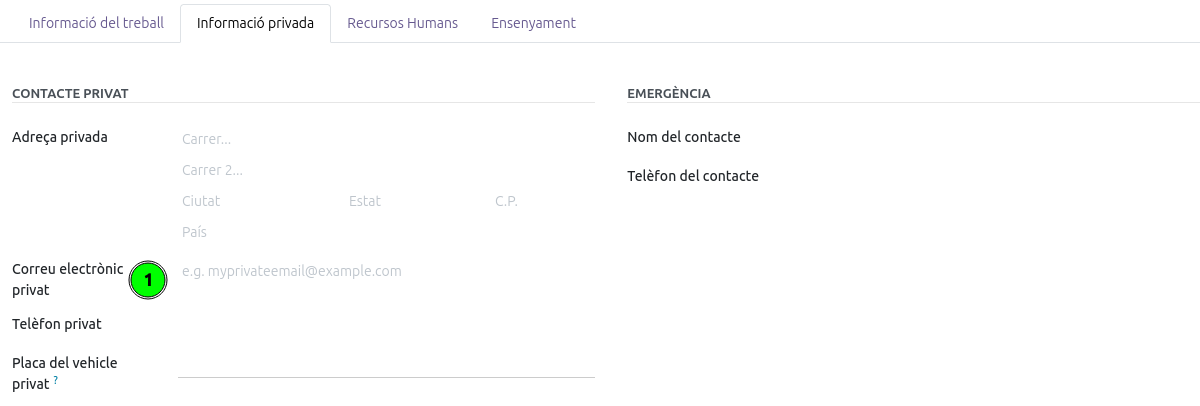
Important: this Private Email field is required for the Google account to be created — the form will not let you save a new teacher/ASP record without it. On records created before this rule, it may still be missing: in that case no account is created automatically and the reason is recorded in the record’s message log (chatter).
Other data: it is important to fill in as much data as possible, such as the emergency contact, personal phone number, car license plate…
Once the data is filled in, save the record (Odoo saves automatically when navigating away, or click the save cloud icon).
What Happens Next
When the record is saved, if all the required data is present (name and private email), the system automatically creates the Google Workspace account in the background:
- Assigns a corporate email
@elpuig.xeill.net(the suggested username, or one generated from the name if none was given or it is already taken). - Generates a temporary password (which must be changed on first login).
- Creates the teacher’s EMS user automatically, with the corporate email as login and Sign in with Google already connected: the teacher enters EMS with the Google button, no separate password is needed and no password email is sent. Teachers get the Teacher permissions; ASP staff get a basic internal user (their permissions arrive with their roles/job position).
- Sends the credentials by email to the private address provided in step 3 (the message also explains how to enter EMS).
- Attaches a PDF with the credentials to the teacher’s record.
The Create Google account button, at the top of the record, lets you force this process instantly without waiting for the background processing.
Special Cases
- The teacher already had a corporate email: if the work email field already contained an
@elpuig.xeill.netaddress, the system adopts it as-is and does not create a new one. If that teacher has no EMS user yet, a Create EMS User button appears at the top of the record instead of Create Google account — it only links/creates the EMS user, without touching the Google account. - The teacher has a work email from another domain: the system does not overwrite it automatically; a notice is posted in the record’s message log for manual review.
- Manual email assignment: the Assign corporate email manually checkbox, on the teacher’s record, lets Human Resources enter the work email by hand, for exceptional cases. When checked, the system does not generate any account automatically. After typing a corporate address, the Create EMS User button appears to create/link the EMS user for it.
- Departure (archiving the record): archiving the employee immediately deactivates their EMS user, so they can no longer sign in. The Google account is not suspended at once: EMS emails the employee (personal and corporate address) telling them the account will be suspended in 30 days, and shows the date on the record. Unarchiving the employee before that date restores the EMS user and calls off the suspension. To keep the Google account while the employee stays archived, press Cancel scheduled deactivation at the top of the record. To suspend it straight away without waiting, press Suspend Google account.
-
The record already existed as a “Pending identification” placeholder: if a working-schedule import created this teacher automatically before their identity was known (see “Teachers Not Yet Hired (Pending Identification)” in Teacher Working Schedules & Schedule Frameworks), the record already has a schedule, subjects and attendance lists set up — only Step 2 and Step 3 above are needed (replace the placeholder name, fill in the private email), then Create Google account. That single click also clears the “Pending identification” badge; nothing about the already-imported schedule needs to be redone.
- The teacher has an EMS user but cannot sign in with Google: if the connection between the EMS user and their Google account is lost, Google accepts the login but EMS answers Access Denied, and no password reset fixes it. A Re-link Google sign-in button then appears at the top of the record, next to Suspend Google account. Pressing it asks Google for the account identifier again and restores the connection; the teacher can log in straight away. It changes nothing else — not the Google account, the password or the corporate address — and it does not appear while the connection is working.