EMS
| Català | Castellano | English |
Teacher Working Schedules & Schedule Frameworks
Manage each teacher’s weekly timetable from their own employee record, and set up the bell-schedule templates (“schedule frameworks”) new teachers start from.
Required role: Department Chief or above (Department Chief, Head of Studies, Director, Administrator) can edit schedules and use the import wizard; every other role can only view their own schedule, read-only, but everyone can export a schedule to PDF.
Concepts
- Schedule framework: a reusable weekly bell-schedule template (periods, breaks, coordination meetings) for a level of studies — e.g. one framework for ESO, one for BTX, one shared by the vocational-training levels. Frameworks never carry real subject assignments.
- A teacher’s schedule: their own personal calendar, built from a framework and then filled in with their actual subjects/groups. It is never shared between two teachers.
- Default schedule framework: the one framework automatically used to start every new teacher’s schedule.
- Reinforcement group: a class group that mixes students from different regular groups (and even different studies) for a specific reinforcement class — it has no tutor or delegate, but still appears in a teacher’s schedule like any other group. See “Reinforcement Groups” below.
Access
- Schedule frameworks: Configuration → Teachers → Schedule frameworks
- Default framework setting: Settings → Employees → “Default schedule framework”
- A teacher’s own schedule: Employees → [open the teacher] → Schedule tab
- Batch import from a file: Configuration → Teachers → Working schedules → ⚙️ (cog) menu → Import: planner data
- Teaching hour reduction types: Configuration → Schedules → Teaching hour reduction types
- Assign a reduction to a teacher: Employees → [open the teacher] → Human Resources tab
Set Up a Schedule Framework
- Go to Configuration → Teachers → Schedule frameworks and create a new one (or open an existing one).
- Set its Name and, if it’s specific to one level of studies, its Level.
- Add its weekly periods in the attendance lines below: day, start/end time, and optionally a name. Use exact times — periods don’t need to be aligned to the hour (e.g.
10:25–11:25). - For breaks and coordination meetings, use the non-teaching field on that line (e.g.
Break,Coordination Meeting) instead of leaving it blank — these are real commitments every teacher following the framework will inherit.
A framework is a template only: it never has subjects or groups assigned to its own periods.
Co-teaching
If two teachers genuinely teach the same class together (same subject, same group, same room, same hour), EMS treats it as a single shared class rather than two independent ones: both teachers are listed as holders of that period, and there is only one attendance session for it — either teacher can mark it, and both see the same result.
This is detected automatically, whether the schedule was built by hand or imported:
- Editing a schedule by hand: if you assign a teacher to a period that exactly matches (same subject, group, room, day and time) a period already assigned to another teacher, EMS merges them into a shared period instead of raising a room-conflict error. If a teacher is later removed from that period while their co-teacher keeps it, the shared period simply reverts to being that co-teacher’s own.
- Importing schedules: if a planner file assigns the exact same class to two teachers, importing it produces one shared period, the same as if you’d set it up by hand.
A shared period is otherwise not any different to look at: it just shows up, identically, on each holder’s own Schedule tab.
Set the Default Schedule Framework
- Go to Settings → Employees.
- Under Default schedule framework, pick the framework every new teacher should start from.
- Save.
This field is required — the module ships with a generic default framework so it is never empty out of the box, but you should point it at the framework that matches your centre’s most common level.
Manage Non-teaching Types
The list of non-teaching reasons (Break, Guard, Coordination Meeting…) shown wherever a period isn’t a subject is configurable, so you can add a new one yourself if your centre’s external planner starts sending a code EMS doesn’t recognise yet — no developer needed.
- Go to Configuration → Teachers → Non-teaching types.
- Click New, set a short Code (must match exactly what the external planner uses for that activity) and a Name (what teachers and reports will show).
- Optionally mark it Is a break (dropped from the weekly hours summary entirely, like the patio break) or Always a fixed-schedule commitment (always counted in the “Other fixed-schedule hours” column, like a guard duty).
- Save. The new type is immediately available in the “non-teaching” dropdown when editing a schedule, and recognised the next time you import a planner file that uses its code.
Manage Teaching Hour Reduction Types
A teaching hour reduction is an entitlement (e.g. an age-based reduction) that adds extra hours to a teacher’s weekly teaching-hours total — unlike a non-teaching type, it is never scheduled as a real block on the weekly grid.
- Go to Configuration → Schedules → Teaching hour reduction types.
- Click New, set a Code, a Name, and the number of Reduction hours it grants.
- Save.
To grant a reduction to a teacher:
- Open the teacher’s employee record and go to the Human Resources tab.
- Under Teaching hour reductions, add one or more types — a teacher can have several at once.
- Save. The reduction now shows up as an extra row (with its own hours) in the “Weekly teaching hours” column of that teacher’s Schedule tab, added on top of their real teaching hours (see “View a Teacher’s Schedule” below).
A New Teacher’s Schedule
When you create a new employee of type Teacher, EMS automatically:
- creates a personal working calendar for them (never shared with anyone else),
- points it at the centre’s default schedule framework.
Nothing needs to be assigned yet — open their Schedule tab and use Edit to start filling in subjects, following the “Edit a Teacher’s Schedule” section below. Renaming the teacher later automatically renames their calendar to match; deleting the teacher automatically deletes their personal calendar.
Automatic check-out on a day with no expected hours. If a teacher checks in on a day their schedule expects nothing of them (their schedule has no time slots yet, e.g. a new teacher or a new course’s schedule not filled in yet; a day they don’t work; or a whole-day absence), the automatic check-out closes the attendance at the end of that day in the schedule’s framework, and leaves a note on the attendance naming it. This keeps a forgotten check-out from turning their next check-in into a check-out. Make sure each teacher’s schedule points at the framework that matches their real working day (e.g. the ESO framework for a morning-only teacher): with a framework that runs until the evening, the check-out would be set that late.
View a Teacher’s Schedule
- Open the teacher’s employee record.
- Go to the Schedule tab.
Each block shows its exact start–end time, the subject/group or the non-teaching reason, and the classroom (taken from the group’s own default classroom). Periods that are still unassigned simply show no block — the framework’s structure (breaks, meetings) is what tells you a slot is expected there.
If a subject has a topic set (see “Edit a Teacher’s Schedule” below), the block’s label shows it right after the subject (e.g. “MP 3161 - Castellà”) — this is how you tell apart the different teachers of a subject that’s actually split into several distinct topics, each taught separately (e.g. a module split by language).
Below the grid, a small summary table shows the teacher’s total weekly hours in two columns:
- Weekly teaching hours: one row per level of studies (e.g. CFGS, CFGM, ESO), one row per reinforcement group taught (these don’t belong to a single level), plus any non-teaching activity not listed in the other column, plus one row per teaching hour reduction type assigned to the teacher (see “Manage Teaching Hour Reduction Types” above) — added as extra hours on top of the real teaching hours.
- Other fixed-schedule hours: guard duties (any day) and coordination meetings specifically on Wednesday.
The break is never counted in either column. A period that only partially overlaps an hour still counts as a full hour. Each column shows its own total, followed by the overall total (24 hours for a full-time teacher with no reduction assigned). This summary always reflects the saved schedule, so it disappears while you’re editing and reappears (updated) once you save.
A block for a break the teacher hasn’t explicitly set up may still show, filled in automatically from the schedule framework(s) of the level(s) the teacher actually teaches — this is a visual aid only; nothing is actually saved for it until it’s added as a real card in Edit mode (see below).
Two blocks sharing the exact same time (see “Mid-Course Subject Handoff” below) show side by side instead of one hiding the other.
Edit a Teacher’s Schedule
The weekly grid splits into 5 day columns (Monday–Friday); within each day, independent cards — one per real or still-unassigned period — hold everything about that block: an optional date range, its own start/end time, a subject/group or a non-teaching reason, and a classroom.
- Open the teacher’s Schedule tab and click Edit.
- Each day’s column starts pre-filled with the framework’s own periods (including its breaks/meetings) as blank cards — pick a subject for one, or a non-teaching reason, from its own dropdown. To add one or more groups, start typing a group’s name in the group field and pick it from the suggestions — each picked group shows as its own removable tag, so you can add several to the same card (click the × on a tag to remove it). This is how you set up a session where the same teacher runs an identical class for two (or more) groups at once, in the same room (e.g. an optional subject combining two official groups), instead of one group silently overwriting the other.
- If the subject is actually split into several distinct topics, each taught separately (e.g. a module split by language) — see “View a Teacher’s Schedule” above — type the topic in the card’s own text field, right below the group tags. It’s optional and free text: type it exactly the same way every time the same topic recurs (e.g. always “Castellà”), so the topic is correctly recognised as the same one everywhere it shows up.
- To change a card’s time: edit its start or end time field directly (moving the start keeps the card’s length).
- To set a classroom other than the group’s own default: pick one from the card’s own Classroom dropdown — leave it blank to keep using the group’s default.
- To remove a card entirely: use its own trash icon.
- To add a card the framework didn’t have (e.g. a teacher who mixes two levels’ bell schedules, or the same weekday/time with two different subjects at different points in the year — see “Mid-Course Subject Handoff” below): click + Add at the bottom of that day’s column, set its time, and fill it in.
-
Click Save to apply, or Cancel to discard everything and leave the schedule untouched.
Cards within a day are always shown sorted by start time, then end time — two cards at the exact same time sort by their own start date instead.
Changing a card’s classroom (step 5) when the class is co-taught: if the new room is free at that day/time, the change applies immediately for every teacher sharing that class — nothing else to do. If the new room is already taken by someone else at that exact time, the change is held back instead of failing outright: a yellow banner appears at the top of the teacher’s own form, regardless of which tab is open (“A classroom change requested from this teacher’s own schedule, but N teaching block(s) could not move to it automatically because of a room collision”), with a Resolve pending classrooms button. See “Resolving a Pending Classroom Conflict” in Groups for how to resolve it from there — the same screen also opens from a group’s own form when a group-wide classroom change hits the same kind of collision.
Leaving a manually-added card unassigned and saving simply drops it — only real assignments are kept. If you re-open Edit later, the framework’s own cards reappear as gaps to fill in, but a discarded manual card does not.
There is no drag-and-drop between cards or days — to move a card to a different day, remove it and add a new one there instead.
Mid-Course Subject Handoff
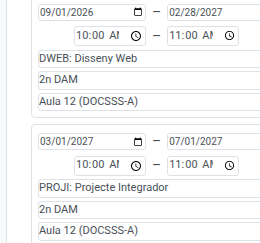
The same weekday/time/room slot can hold two different subjects across the year — e.g. a regular module runs until February, then the end-of-course project takes over the exact same slot for the rest of the year. Set both halves up on the calendar upfront, in September, instead of having to remember to edit the schedule on the actual handoff day.
- Open the teacher’s Schedule tab and click Edit.
- Fill in the first card as usual (subject, group, time).
- Set its two date fields (start, then end) to the first half of the year (e.g. September to February).
- Click + Add on the same day to add a second card, and give it the exact same start/end time as the first.
- Fill in the second card with the other subject/group, and set its own two date fields to the rest of the year (e.g. March to July).
-
Click Save.

Both cards then show up side by side on the read-only weekly grid, instead of one hiding the other. Leaving a card’s date fields blank means “valid all course year” — the normal, unchanged default for a card that never needs to hand off to anything else.
Import Working Schedules From a File
If your centre already exports schedules from an external planning tool (XML), use the batch importer instead of building schedules by hand — each file can already describe several teachers at once (matched by e-mail), and you can attach more than one file in the same run. There is no separate per-teacher import any more: a teacher joining mid-year gets their schedule via New on their own Schedule tab (see “Start a Teacher’s Schedule From a Framework or From Another Teacher” below) or by hand, never a single-teacher file upload.
The wizard walks you through several screens, each showing its own short explanation of what it checks and what to do with it — the numbered steps below are a detailed reference, not the only place to find out what’s going on.
- Go to Configuration → Teachers → Working schedules.
- Open the ⚙️ (cog) menu above the list and choose Import: planner data.
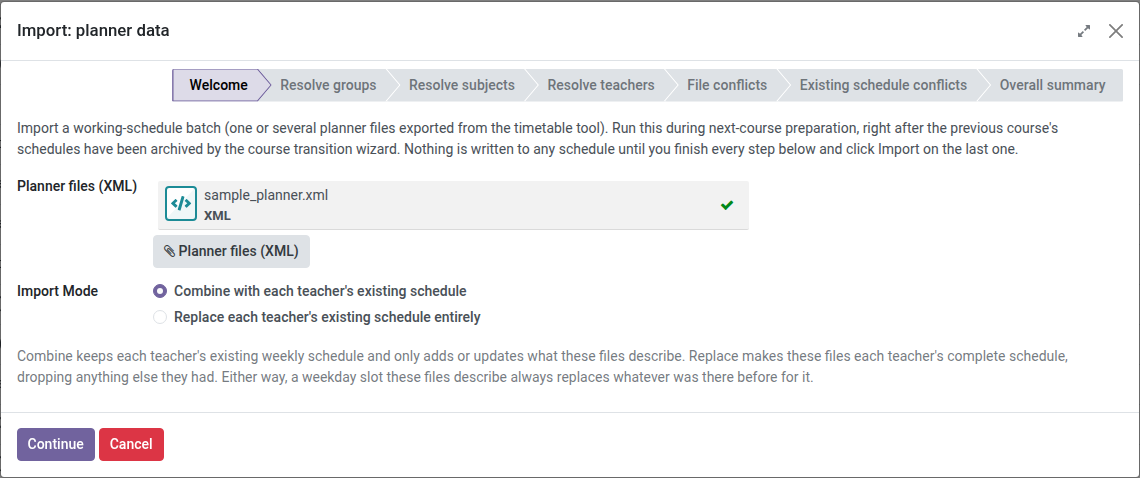
- On the Welcome screen, attach one or more XML files and choose how this import should treat each teacher’s existing schedule:
- Combine with each teacher’s existing schedule (the default) — nothing a teacher already has is lost unless these files also describe it. Use this for a teacher shared between departments whose files are imported at different times (e.g. a reinforcement teacher, one file per department).
- Replace each teacher’s existing schedule entirely — these files become that teacher’s complete schedule; anything they had that isn’t in these files is dropped. Use this when a file is meant to be the full, authoritative description of a teacher’s week.
Either way, if these files describe the exact same day and time a teacher already had something else scheduled, the new one always wins. Uploading several files together in the same run (e.g. one per department) always combines them with each other first, regardless of which option you pick — the choice only affects what happens to a teacher’s schedule from an earlier, separate import.
Then click Continue — nothing is written yet at this point, and nothing about the files’ content is checked here either.
-
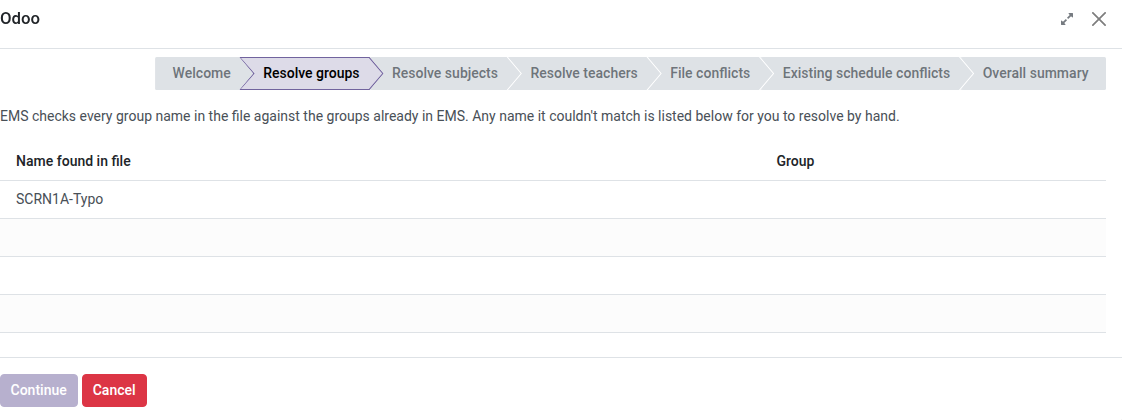
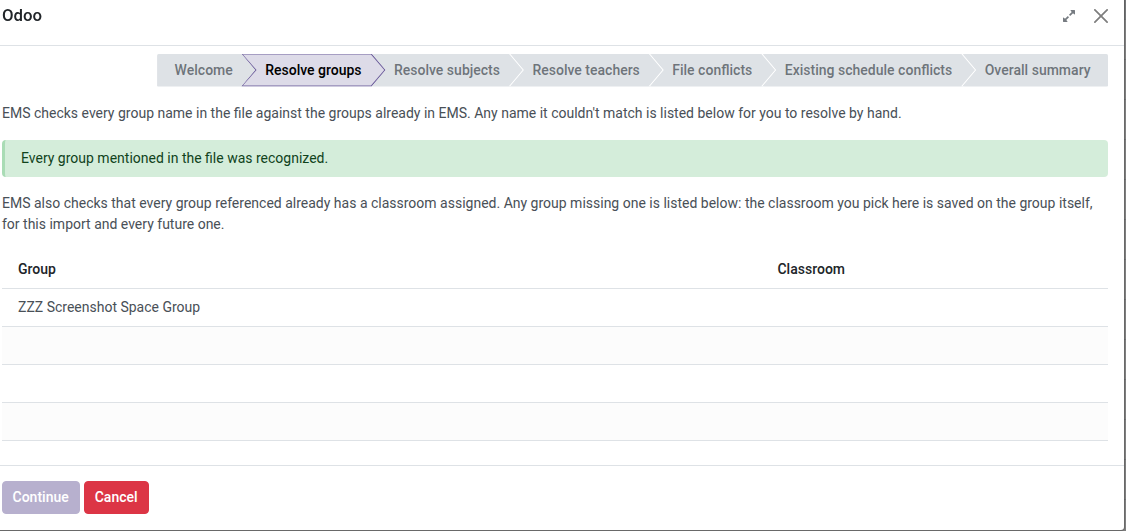
If the files mention any group name EMS couldn’t match automatically, a Resolve groups screen lists each one: pick the real group from the dropdown for each row (or create one on the spot, the same way you would from any other group field), then click Continue. If every group was recognized automatically, you’ll see a confirmation message instead of a list. Continue shows grayed out until every row has a group picked.
This same screen also checks that every group referenced already has a classroom set — a group whose name resolved just fine but has no room of its own gets its own second list here, right below the first. Pick a classroom for each one and click Continue; the classroom you pick is saved on the group itself, not just for this one import, so you’ll never be asked again for that group. If nothing is missing, you won’t see this second list at all.
-
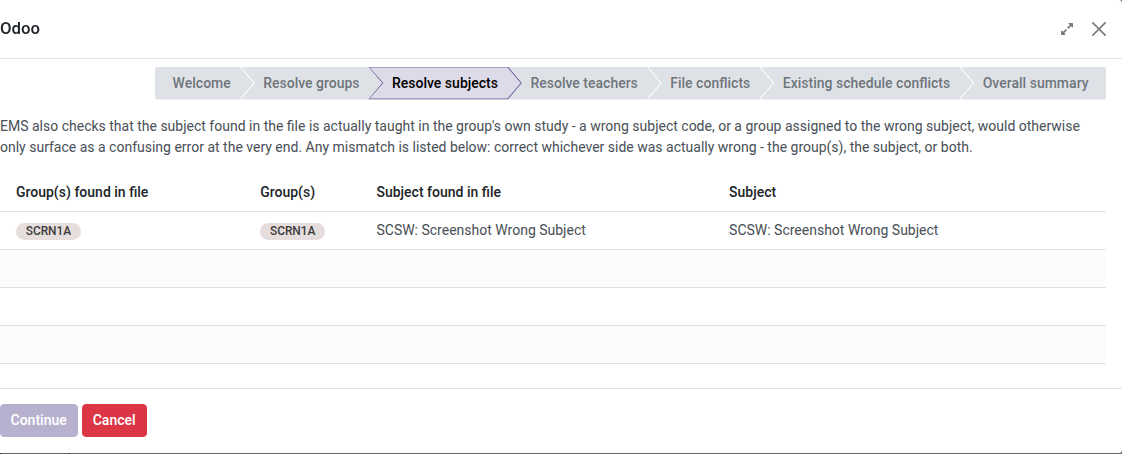
If a file names a subject that isn’t actually taught in the group’s own study (a wrong subject code, or a group assigned to the wrong subject), a Resolve subjects screen lists each mismatch, letting you correct either side — whichever one was actually the mistake: the Group(s) field starts on the file’s own group(s) but can be changed (remove the wrong one, add the right one, same as any other group tag field); the Subject dropdown starts on the file’s own subject and only lets you pick one actually taught in the group’s (possibly just-corrected) study. Fixing the group alone is often enough on its own, if the file’s subject was right all along. If every subject matched correctly, you’ll see a confirmation message instead. Continue shows grayed out until every row has a valid combination.
-
If the files mention a teacher e-mail or not-yet-hired post code (
X1,X2…) EMS couldn’t match to an existing teacher, a Resolve teachers screen lists each one, with New ticked by default (assuming a genuinely never-hired teacher) — leave it ticked to create a brand-new pending-identification teacher for it at the final Import step (see “Teachers Not Yet Hired” below); for an e-mail-shaped row, the file’s own e-mail is additionally kept and pre-filled as their Work email, editable by hand (Assign corporate email manually ticked) rather than auto-generated, since it hasn’t been confirmed yet. If it’s actually a typo/mismatch of an already-existing teacher — or a code/e-mail you recognize as the SAME real person already listed under a different row on this same screen — untick New and pick the real teacher from the dropdown instead (unticking is what unlocks it); picking the same teacher for two different rows resolves both to that one person, no duplicate created. If every e-mail/code was recognized, you’ll see a confirmation message instead. Continue shows grayed out here too until every row has either a teacher picked or New ticked.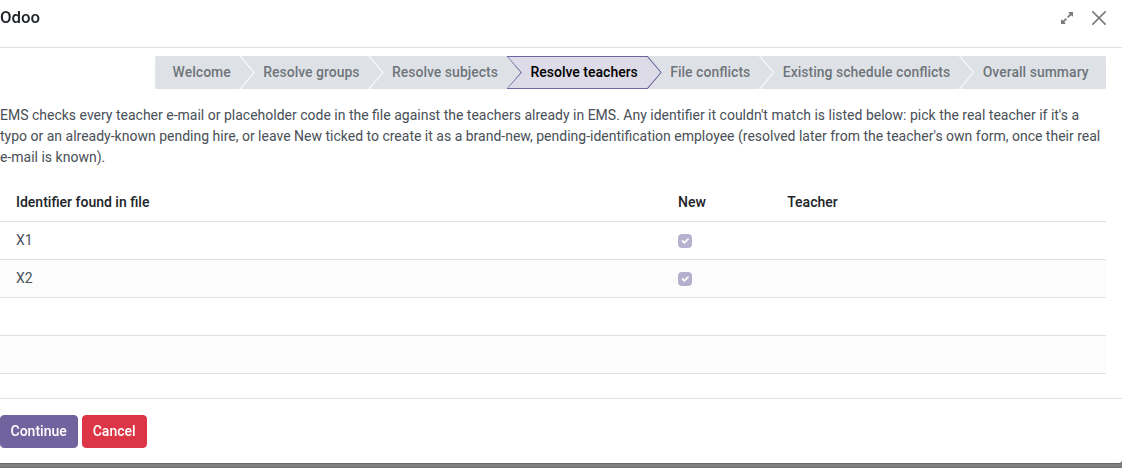
-
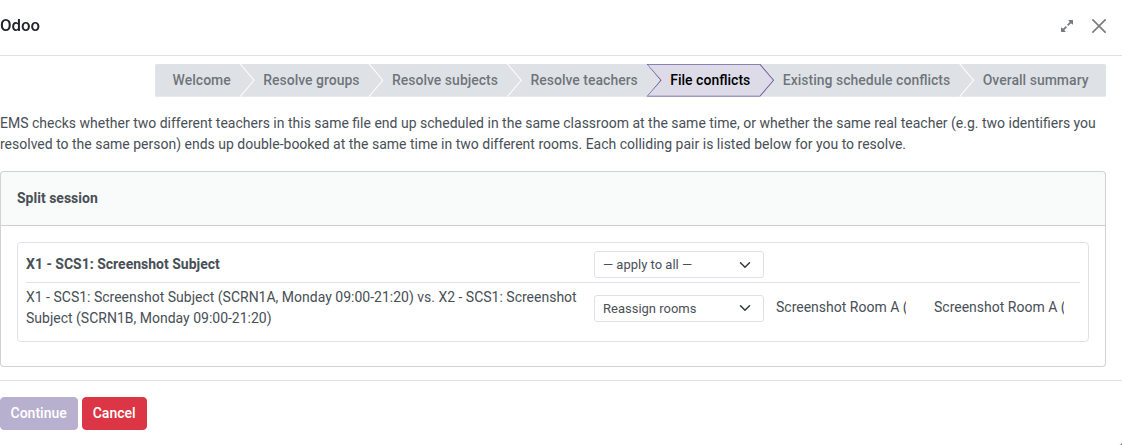
If two different teachers in the same batch end up scheduled in the same classroom at the same time — or the same real teacher (e.g. two identifiers you resolved to the same person on the previous screen) ends up double-booked at the same time in two different rooms — a File conflicts screen lists every colliding pair, grouped into a card per conflict type (“Co-teaching”, “Split session”, “Room conflict”, “Same teacher, different room”), and within each card, one block per teacher+subject combination (ignoring which specific group/day/time each individual pair happens to fall on) holding every pair that shares it. Each block has its own dropdown at the top (“— apply to all —”) — pick a resolution there and it’s applied to every row underneath at once (you can still change any individual row by hand afterward). Each row spells out both colliding entries in full, joined by “vs.” — reading left to right is what “Left”/”Right” mean in the resolution options below. The resolution options themselves: “Confirm” if they’re genuinely sharing that class (only offered for “Co-teaching” rows); “Reassign rooms” for a real room clash — pick the actual room for each side, since both start pre-filled with the same colliding one; or “Left prevails”/”Right prevails” to simply keep one side (the one before/after “vs.” on that row) and drop the other. A “Same teacher, different room” row only ever offers “Left prevails”/”Right prevails” — reassigning a room fixes nothing when the real problem is one teacher needed in two places at once. If there’s nothing to resolve, you’ll see a confirmation message instead. Continue shows grayed out until every row has an actual resolution (for “Reassign rooms”, that means the two rooms must actually differ).
-
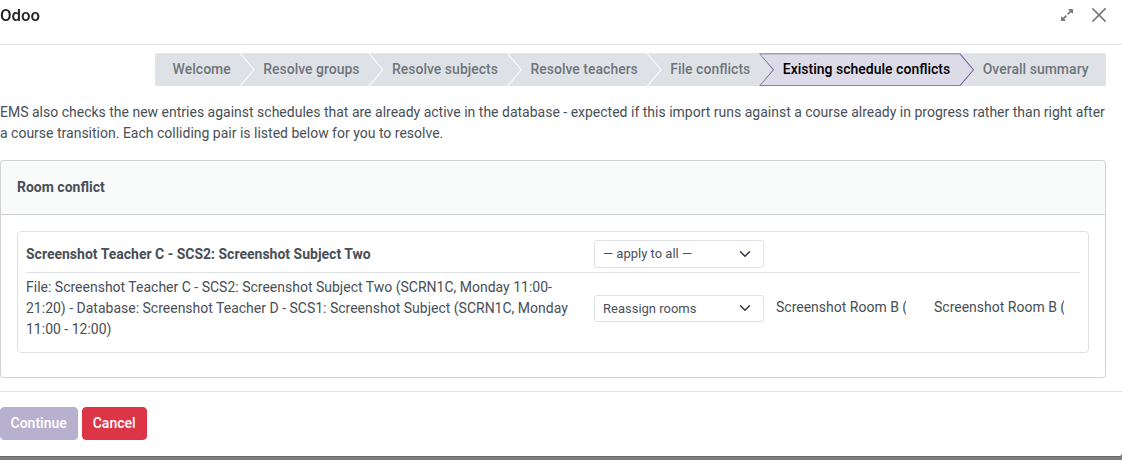
If any entry from the file collides with a classroom+time already actively used by someone else’s existing schedule, an Existing schedule conflicts screen lists each one the same grouped-cards way — here each row explicitly prefixes its two sides “File: …“ (the new entry) and “Database: …“ (the already-existing session), instead of “vs.” — “Left prevails” always means the File side wins, “Right prevails” always means the Database side wins, matching that same order. With the same resolution options as “File conflicts” above: choosing “Left prevails” archives the existing session (freeing the slot for the new one); choosing “Right prevails” drops the new entry instead, keeping the existing session untouched. If there’s nothing to resolve, you’ll see a confirmation message instead.
-
An Overall summary screen recaps the whole run before you commit to it: a count of every unresolved group name, teacher e-mail/code, pending teacher, and conflict resolved along the way, plus a list of every teacher this import already matched to a real, existing employee (whether recognized automatically or corrected on the “Resolve teachers” screen) — a heads-up that this import is about to update (override) their schedule/subject assignments. If none of the file’s teachers already exist, you’ll see a confirmation message instead of that list. Since none of the earlier steps let you go back, this is your last chance to check everything looks right before clicking Import.
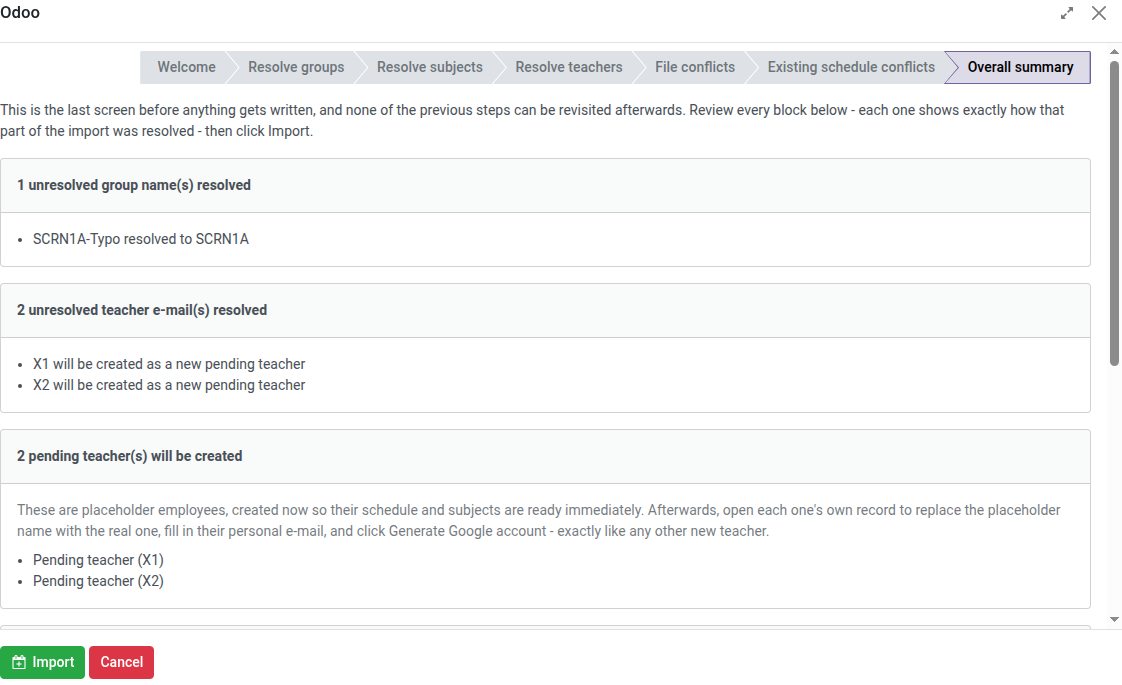
As soon as this screen appears, a CSV file with that same summary — one row per resolution made — downloads to your computer automatically, ready to keep as your own record of the run. Scroll to the bottom of the screen to see the download link if you want to grab it again.
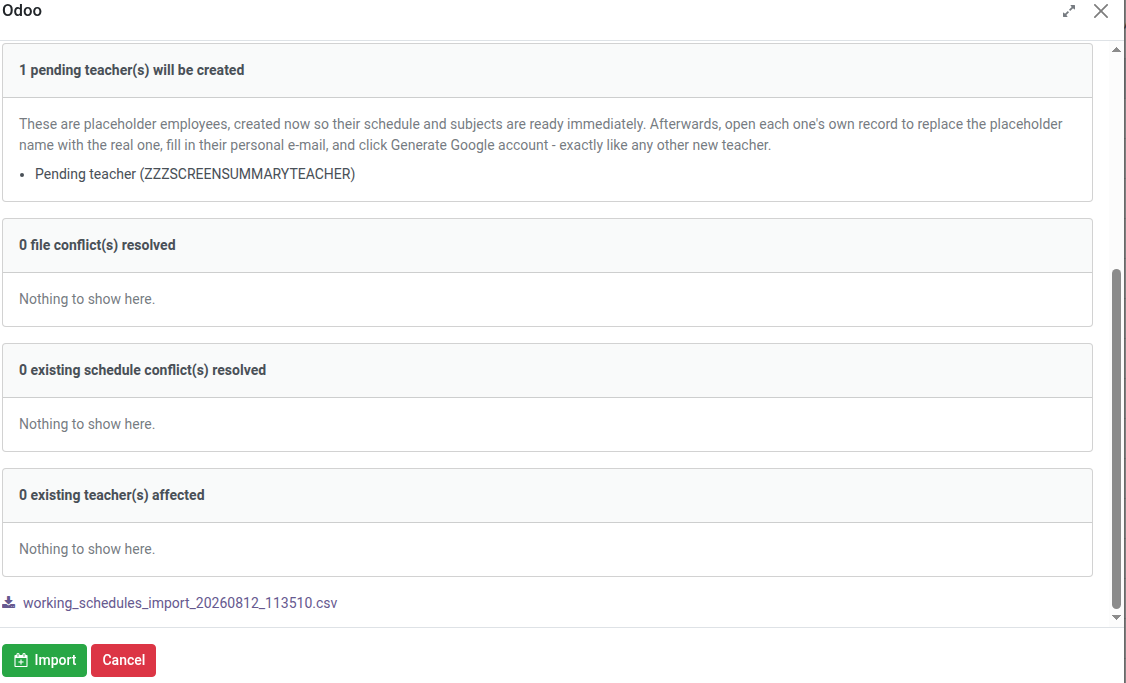
- Click Import. This is the point where everything is actually written.
Run this during next-course preparation, once the previous course’s schedules have already been archived by the “Setting Up the Next Course” wizard — running it against a course already in progress can create conflicts that then need manual resolution.
If any of the teachers found across the files already has a schedule, it’s updated once you click Import according to whichever option you picked on the Welcome screen (combine or replace) — existing subject assignments and attendance templates stay in sync with the result either way.
Teachers Not Yet Hired (Pending Identification)
New timetables sometimes arrive before every post is staffed — your planner tool names those rows with a placeholder code (X1, X2…) instead of a real teacher’s e-mail. Importing such a file no longer fails on those rows:
The same pending-identification mechanism also covers a genuine e-mail that doesn’t match any existing teacher — tick New for that row on the Resolve teachers screen instead of picking one (see step 5 of “Import Working Schedules From a File” above). The only difference from a placeholder code is that the file’s e-mail is kept, pre-filled as an editable Work email (Assign corporate email manually ticked), rather than left for a later “Generate Google account” to assign automatically.
- Attach the file and click through the wizard as usual (see “Import Working Schedules From a File” above) — a placeholder code isn’t treated as a problem at any step.
- Click Import on the final step. A new employee record is created for each not-yet-identified code, already named e.g. “Pending teacher (X1)”, with their schedule, subjects and attendance lists already set up exactly as if they were a known teacher.
- These records show a “Pending identification” badge in the Teachers list/kanban and a ribbon on their own form, so they’re easy to find (use the Pending identification filter/group-by in the Teachers list) and easy to tell apart from a real, already-identified teacher.
When the post is filled:
- Open the pending teacher’s employee record.
- Replace the placeholder Name with the real teacher’s name, and fill in their Personal email.
- Click Generate Google account, exactly as you would for any new teacher.
That single click both creates the teacher’s Google Workspace account/EMS login and confirms their identity — the “Pending identification” badge disappears, and nothing about their already-imported schedule, subjects or attendance lists needs to be redone.
If this pending teacher will never get a Google Workspace/EMS account created from this record (e.g. they already have an account under a different, unmerged record, or the post turns out not to need one), open their record and click Mark as identified in the header instead. After confirming, it clears the “Pending identification” badge on its own, without creating any account — use it only as a manual override for cases Generate Google account doesn’t cover.
Re-importing an updated file for a post that’s still unstaffed (same placeholder code) updates that same pending teacher’s schedule in place, the same way re-importing an already-identified teacher’s file does — it never creates a second, duplicate record for the same code.
Start a Teacher’s Schedule From a Framework or From Another Teacher
Use this to reset a teacher onto a different framework (e.g. they now teach a different level), or to set up a substitute with the same schedule as the teacher they’re covering for:
- Open the teacher’s Schedule tab and click New.
- Choose either a schedule framework (starts blank, following that framework’s periods) or another teacher (copies their real subjects/groups — ideal for substitutions).
- Click Load — you’ll see the loaded schedule in edit mode.
- Adjust anything needed, then click Save to apply, or Cancel to discard and keep the teacher’s previous schedule untouched.
New replaces the whole schedule — nothing from before is kept unless it also appears in what you just loaded. Cancelling before Save leaves everything exactly as it was.
Reinforcement Groups
A reinforcement group is a class group (the same “Groups” record a regular class group is) used for a support/reinforcement class that mixes students from different regular groups, and even different studies — e.g. a small maths reinforcement group with students pulled from three different first-year groups.
- Go to Configuration → Students → Groups and create a new one.
- Set its Group type to Reinforcement. This hides the Level/Study/Course/Acronym/Tutor/Delegate fields (a reinforcement group has none of these) and lets you type the group’s Name directly — set it to exactly match whatever your external planner exports for this group, since the schedule importer matches by exact name.
- Set its Classroom, same as any other group — it’s still required for the schedule to import correctly.
- On the Students tab, add the students who attend this reinforcement class, regardless of which regular group or study they belong to. This does not change each student’s own main group.
- Save.
Once created, a reinforcement group is used in a teacher’s schedule exactly like any other group — assign it manually in the Schedule tab, or let the file importer resolve it by name.
Export a Teacher’s Schedule to PDF
- Open the teacher’s Schedule tab and click PDF.
- A printable weekly timetable is generated and downloaded — one row per period, one column per weekday, each cell showing the subject/group (with its topic, when set) or non-teaching reason and the classroom.
The document opens with the teacher’s name and the current course, followed by their department (if assigned) and their role(s) — a tutor’s line also shows which group they tutor, and a department head’s line shows which department.
This is also available from the employee form’s own Print menu, in case you need to export several teachers’ schedules from a list view.