EMS
| Català | Castellano | English |
Groups
A Group is the class a student belongs to. There are two kinds:
- Main: the group a student is actually enrolled in — has a tutor, a delegate, and a single level/study/course/acronym (e.g.
DAM1A). - Reinforcement: shows up in the teaching schedule like any other group, but has no tutor or delegate, and can mix students from different main groups and studies (e.g. a shared English reinforcement class).
For the group’s weekly timetable (aggregated from teachers’ own schedules) and its PDF export, see A Group’s Weekly Schedule — this page covers creating and managing the group itself.
Required role: Department Chief (or above — Head of Studies/Deputy/Director/Administrator already have this access via role escalation)
Access
Navigate to: Educational Community → Groups
Create a Main Group
- Click New.
- Leave Group Type on Main (the default).
- Fill in:
- Level and Study (both required).
- Course (required): the year number (e.g.
1). - Acronym (required): e.g.
A. The group’s name is built automatically from Study + Course + Acronym (e.g.DAM1A) — you don’t type it directly. - Tutor: the teacher responsible for this group. Assigning it here automatically grants that teacher the Tutor role.
- Delegate: a student representative (only selectable once the group has students).
- Shift, Reference classroom, External ID (Esfera/SAGA code) as needed.
- Click Save.
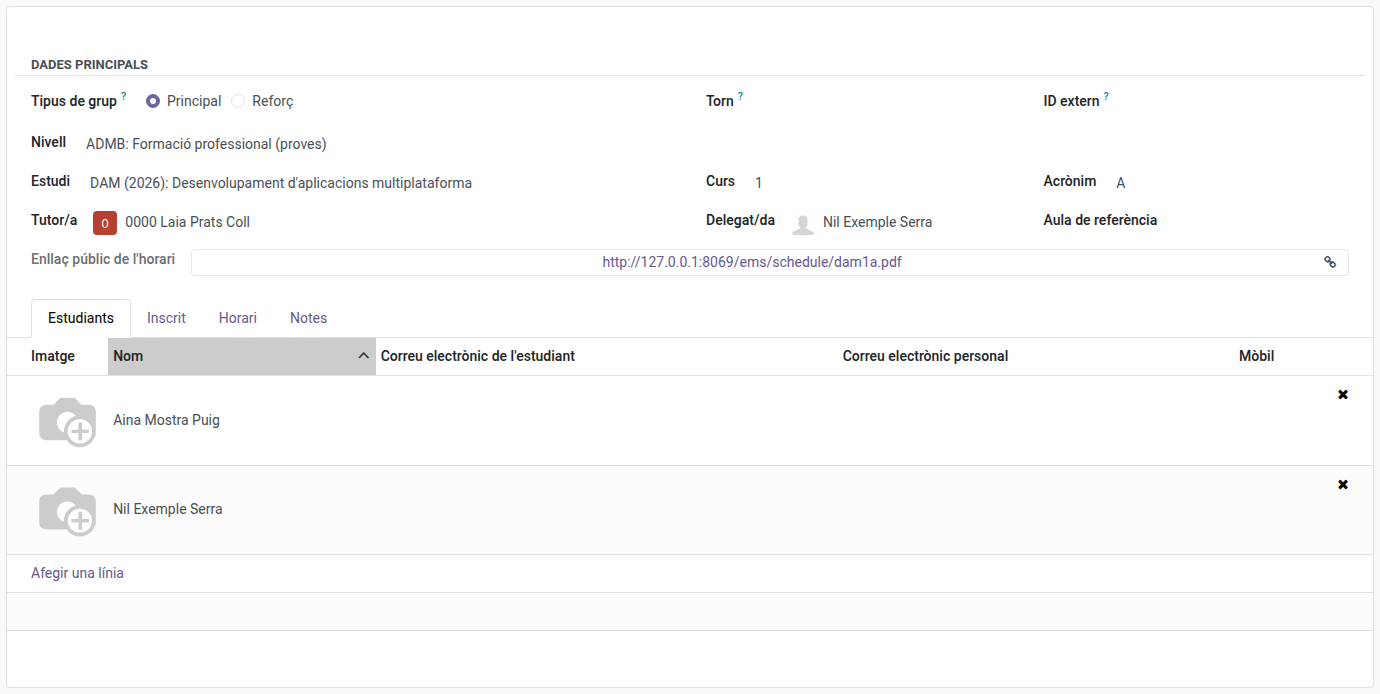
Students aren’t added from here — see the Students tab to review who’s assigned, but a student’s own record (or the enrolment flow) is what actually assigns them to a group.
Changing a student’s group moves their subject enrollments too. Editing a student’s Main Group field (on their own form, Studies tab) — this includes the group tutor, who can now do this directly for their own tutored students, see Changing a student’s group — automatically moves any subject enrollment that was in the old group over to the new one; a subject already enrolled through a different group (e.g. a reinforcement group) is left as-is. The change is rejected if a subject in the old group already has grades recorded for that student.
Create a Reinforcement Group
- Click New.
- Switch Group Type to Reinforcement. Level, Study, Tutor and Delegate disappear — they don’t apply.
- Fill in a Name directly (e.g.
REF-MATHS). - Click Save.
- Add students the same way as for any other group: from the student’s own form (or the enrolment flow), enrol them in a subject with this reinforcement group set as the Group — they can come from any main group/study. They then show up in this group’s own Enrolled tab.
Switching a Group’s Type
You can switch an existing group between Main and Reinforcement, but:
- Switching Main → Reinforcement is blocked if the group still has students enrolled as their main group — reassign them to another group first.
- Switching Main → Reinforcement clears the fields that no longer apply (level/study/course/acronym/tutor/delegate).
Changing a Group’s Reference Classroom
Changing a group’s Reference classroom (the group’s own default room) automatically moves every one of that group’s classes still using the old room to the new one. If the new room is already taken by someone else at the exact same day/time as one of those classes, that one specific class is left in its current room instead of failing the whole save — see “Resolving a Pending Classroom Conflict” below.
The same collision handling also applies when a single class’s room is changed from a teacher’s own Schedule tab (see Edit a Teacher’s Schedule), or when it’s changed directly from the group’s own Schedule tab (see A Group’s Weekly Schedule) — all three cases are resolved from the same screen.
Resolving a Pending Classroom Conflict
When a classroom change (any of the three kinds above) can’t apply automatically because the new room is already taken, a yellow banner appears at the top of the form, visible regardless of which tab is open:
- On the group’s own form: “N teaching block(s) couldn’t move to their requested classroom automatically because of a room collision.” — this covers both a group-wide reference-classroom change and a single block edited directly from the group’s own Schedule tab, since both end up needing the exact same resolution.
- On the teacher’s own form, for a single class changed from their Schedule tab: “A classroom change requested from this teacher’s own schedule, but N teaching block(s) could not move to it automatically because of a room collision.”
Click Resolve pending classrooms on either banner to open the resolution screen, which lists every still-unresolved conflict as a “Room conflict” row (grouped by teacher + subject when there’s more than one), each showing the pending class on one side and the existing session it collides with on the other. For each row, pick a resolution:
- Reassign rooms — pick a different room for each side (both are pre-filled with the same colliding room to start from; Confirm stays disabled until you’ve picked two genuinely different rooms).
- Left prevails — the pending class takes the requested room; the existing session it collided with is archived.
- Right prevails — the pending class keeps its current room for that slot instead (a deliberate exception from the group’s own room, or from what was requested); the existing session is left untouched.
Click Confirm once every row has a valid resolution. The banner disappears once nothing is left pending.
For a co-taught class, the same collision shows up on every co-teacher’s own form (and on the group’s own form) at once, since it’s genuinely the same conflict seen from each side. Resolving it from any one of those screens clears it everywhere — there’s no need to repeat the resolution on the other teacher’s schedule or on the group’s own form.
Delete a Group
Select it in the list and use the Action menu (⚙) → Delete. Blocked if the group is still referenced elsewhere (students, sessions, teaching assignments…).
Archive a Group (instead of deleting it)
If a group simply isn’t running this course but might come back in a future one (a cycle skipping a year, a shift being suspended temporarily…), archive it rather than deleting it — archiving keeps its history (tutor, classroom, past students/schedule) so you can bring it back exactly as it was, instead of recreating it from scratch later.
- Select the group in the list.
- Use the Action menu (⚙) → Archive.
- It disappears from the normal list. To find it again later: open the Filters menu in the search bar and enable Archived.
If you try to create a new group with the exact same name as an already-archived one (e.g.
recreating DAM1A by hand instead of reactivating it), EMS stops you and offers a Reactivate
button right in that message — one click restores the existing group (with all its history)
instead of creating a confusing duplicate. If you don’t want to reactivate it, just close that
message: nothing will have been created.
If the group you’re archiving still has active students in it, EMS asks you to confirm first: archiving is always allowed and never removes or unenrolls anyone, it just stops the group from showing up in the default views. Click Proceed to archive it anyway, or Close to leave it untouched. If those students are still there simply because the end-of-course transition to next year hasn’t run yet, that process will move or clear them from this group when it does — archiving the group now doesn’t need to wait for that.