EMS
| Català | Castellano | English |
Notices: Sending Bulk Emails to Students and Families
Required role: Administrator (or Director, who has the same full visibility — see below)
What a Notice Is
A Notice is a bulk email sent to a set of students and/or their families — for example, a reminder about an upcoming deadline or an announcement affecting one or more groups. Found under Communications → Notices.
Creating and Sending a Notice
- Communications → Notices → New.
- Fill in the Subject and the Message (rich text, images supported).
- Review the Signature underneath it — pre-filled from your centre’s default (see Customizing the Signature below), but freely editable or clearable for this one notice only.
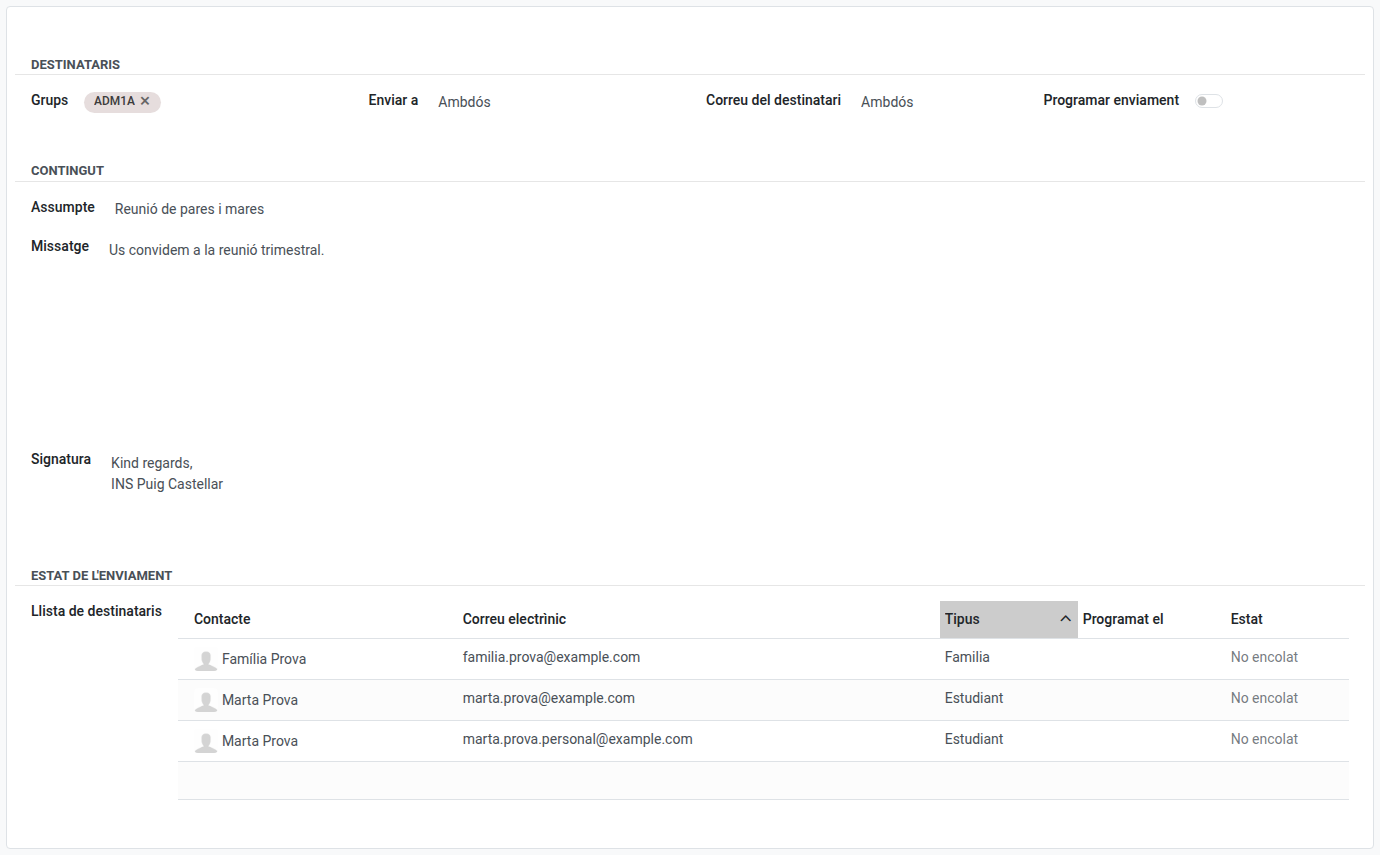
- Choose Send to: Students, Families, or Both.
- If your selection includes students, choose Recipient email: Corporate (a student’s institutional Google Workspace address), Personal (their personal address), or Both (default) — if a student has both addresses, “Both” sends the notice to each one separately. This option has no effect on families, since they only ever have one email address.
- Add one or more Groups — the recipient list is built automatically from each group’s students and, when “Families”/”Both” is selected, their linked family contacts (a minor student’s families are always included; an adult student’s families only if the student has explicitly authorized sharing).
-
Review the Recipient list — you can also add or remove individual rows by hand; manual rows are preserved even if you change the selected groups afterwards. If any students have no address matching your Recipient email choice (e.g. “Corporate” was picked but a student’s institutional account hasn’t been created yet), a warning names them so you know they were left out.
Since 18.0.0.26.0: a recipient row’s email must be well-formed (
name@domain) — EMS refuses to save a value that isn’t, such as a phone number typed in by mistake. - Either:
- Click Send to queue the emails immediately, or
- Tick Schedule sending and pick a date/time, then click Send — the notice moves to Scheduled and the emails go out at that time.
- The notice’s State tracks progress: Draft → Scheduled → Sent (or Failed if every recipient’s email failed). Each recipient row shows its own delivery status, with any error detail available on failed rows.
A scheduled notice (not yet sent) can be cancelled, returning it to Draft so you can edit and resend it.
If a recipient hits Reply on the email they received, it goes straight to whoever actually sent the notice — not to a shared technical address — so a conversation started from a notice reaches the right person directly.
Customizing the Signature
Every notice email ends with a Signature — by default, whatever is configured centre-wide under Settings → EMS Management → Notice email signature, a rich-text field you can write however you like (a name, a role, contact details — or leave it blank for no signature at all). It’s translatable: use the small translation icon next to the field to write a different version per language, so recipients see the signature in their own language automatically.
Changing the centre-wide default only affects notices created afterward — each existing notice already has its own copy of the signature (from step 3 above), which you can also override individually without touching the shared default.
Who Sees Which Notices
Everyone with access to Notices — Administrators, the Director, Head of Studies, Deputy Head of Studies and the Quality coordinator alike — sees every notice centre-wide, but the list always opens filtered to “Show only mine” by default, so day to day everyone comfortably works with just their own. Removing that filter (in the search bar, at the top of the list) reveals everyone’s notices, for whenever you need to supervise.
- Administrators and the Director can fully manage every notice regardless of the filter — it only affects what’s shown by default, not what they’re allowed to do.
- Head of Studies, Deputy Head of Studies and the Quality coordinator can only edit or delete the notices they personally created — someone else’s notice opens in read-only mode even with the filter removed. See the Head of Studies manual for their perspective.
If your account isn’t linked to a teacher (a rare case — most Administrator/Director logins are held by an actual teacher) and you’d rather never see “Show only mine” checked, remove it once and use the search bar’s Favorites → Save current search, ticking Default filter — Odoo remembers that per login from then on.
Deleting vs. Archiving
A notice can only be permanently deleted while it is still in Draft — once it has been scheduled, sent, or has failed, EMS blocks deletion (it has real delivery history worth keeping) and asks you to Archive it instead (⚙ menu → Archive). Archived notices are hidden from the default list; use Filters → Archived to find them again.