EMS
| Català | Castellano | English |
Managing student and family contacts
This guide explains how to manage student, family, applicant and provider contacts: how a contact’s type changes as it moves through the centre, how to link a family member to a student, and how to register bonifications and exemptions.
Contents
- Contact types
- The student’s form
- Adding a family contact to a student
- Enrolling a student in subjects
- Bonifications and exemptions
- Filters applied when you open the student list
- Columns shown in the student list view
- Fields only admin/secretary/Head of Studies/tutors can see
Contact types
Every person or organisation in EMS is a contact with a type: Student, Family, Applicant, Alumni, Withdrawal or Provider. A contact’s type changes automatically as it moves through its normal path — an applicant becomes a student once admitted, a student becomes alumni (if they graduated) or withdrawal (if they didn’t) once they leave, and either can become a student again on re-enrolment. Adding a new contact under an existing student or provider (from the “Contacts & Addresses” tab) sets its type to Family or Provider automatically — you never need to pick it manually there.
Student ID (IDALU). Fill in the Student ID field (at the top of the form, Identification column) when you create a student: EMS doesn’t save a new student without it. Each IDALU belongs to a single contact across the whole centre, archived contacts included — if you type one that is already in use, EMS tells you which contact has it (for example, a former student who is coming back): open that record instead of creating a new one. Once a student has a Student ID, it can be corrected but never left empty again.
A student record that already existed with no Student ID keeps working normally — editing, course transition, withdrawal, graduation — you don’t need to fill one in by hand just because it’s missing; EMS saves it the next time one becomes available for that student.
Since 18.0.0.25.0: the Student ID is required for new students and unique across every contact.
How to mark a graduation or register a withdrawal, and everything that happens to a student’s data when they do, is covered in Marking a graduation and registering a withdrawal.
The student’s form
The top of the form gathers the student’s data without switching tabs:
- First name and Last name, with the Personal email and the Corporate email below.
- Three columns: Contact (address, phones and language), Identification (ID card/NIE, passport, Student ID, medical ID, NUSS and car plate) and Personal data (birth date, whether they are an adult, birth country, citizenship, benefits and special educational needs).
- Authorizations: the Yes/No summary of image rights, school trips, health data and sharing with the family.
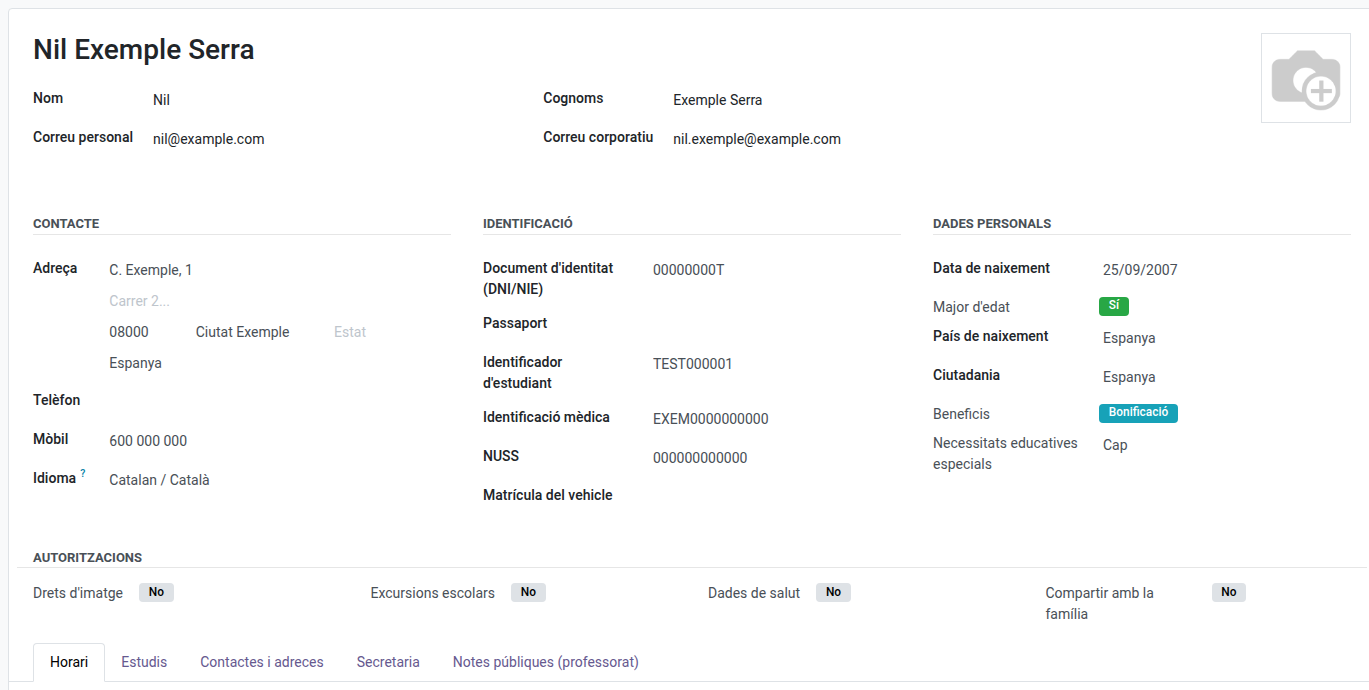
The tabs are below: Schedule (the one that opens by default), Studies (group, subject enrollments and academic history), Contacts & Addresses (family members), Secretary (authorizations list, bonifications and exemptions, documentation and bank accounts) and the notes: see A Student’s Public and Private Notes.
Adding a family contact to a student
Open the student’s record and, in the Contacts & Addresses tab, click Add contact:
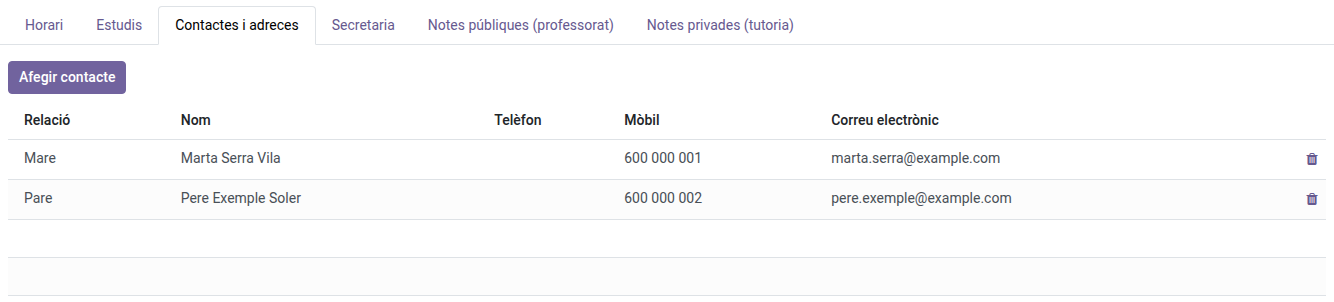
- Choose the relation (Father, Mother, Legal guardian, Sibling…).
- Either pick an existing contact already in EMS, or fill in the details for a new one — a new contact needs at least a first or last name, one identification document (DNI/NIE or passport) and one way to reach them (phone, mobile or email).
- Save. The new relation appears immediately in the student’s contact list, together with the student’s own address prefilled on it (editable if the family member lives elsewhere).
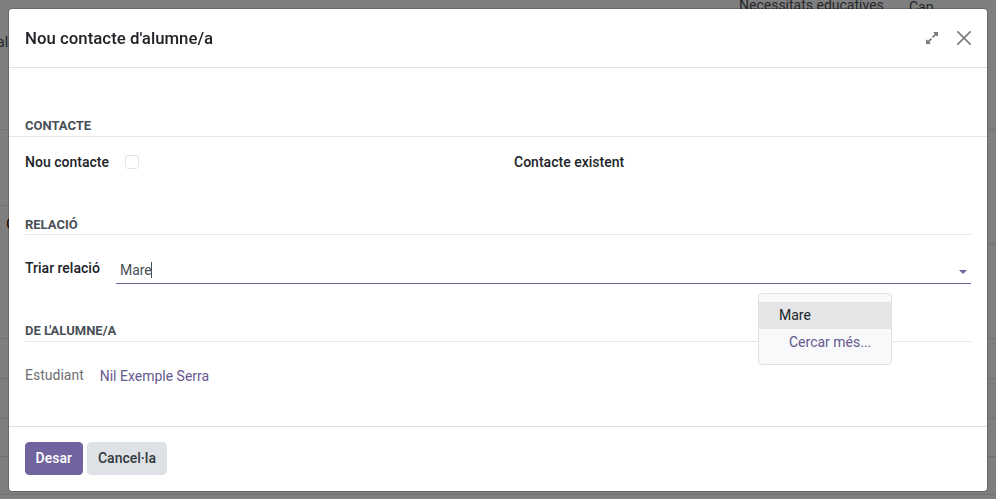
The same relation shows up on the family member’s own record too, listing which student(s) they are related to.
Since 18.0.0.26.0: any email address entered on a contact (personal or student/corporate) must be well-formed (
name@domain) — EMS refuses to save a value that isn’t, such as a phone number typed in the wrong field by mistake.
The personal email of a student, applicant or family member can’t be an address of the centre’s own domain (for example, @elpuig.xeill.net): that is the corporate account, which EMS creates and manages itself (shown as Corporate email). EMS refuses to save it and asks for a personal address instead.
To remove a family member, click the trash icon on their row and confirm with Ok. The family member is no longer linked to the student. If they are left related to no other student and have no user (portal access), their contact is deleted too; otherwise it is kept.
Enrolling a student in subjects
A student’s main group (Studies tab) does not by itself enroll them in any subject — that is a separate step, right below it in the same tab: add one line per subject, choosing the subject and the group it is taught in (usually the student’s own main group, but a different one for a subject taken elsewhere, e.g. a reinforcement group). Once a subject is added here, the student starts appearing in that subject’s attendance sheets and grading sessions. A subject already added can’t be picked twice — it drops out of the selection list automatically.
Removing a subject line is blocked once the student already has grades recorded for it, to avoid silently losing graded work — un-enroll before any grade is entered if a mistake needs correcting.
Changing a student’s main group moves their subject enrollments too. If you change the Main Group field itself (Studies tab), any subject enrollment that was in the old group moves automatically to the new one — a subject already enrolled through a different group (e.g. a reinforcement group) is left as-is. This is rejected, for the same reason as above, if a subject in the old group already has grades recorded. The group tutor can do this too, for their own tutored students — see Changing a student’s group.
Changing a student’s study refreshes their subject enrollments from the new study’s enrollment template. Change the Studies field itself (not just the Main Group) and, on save, EMS automatically picks the first group of the new study (alphabetically) as the new Main Group and regenerates the subject enrollment lines from the enrollment template configured for that study and course — the same subjects a proposal for that study/course would offer. If the new study has no group yet, nothing is auto-enrolled until one is created; add the subject lines by hand once it is. Old subject enrollments not part of the new template are removed, except any that already have grades recorded — those are kept as-is and noted in the student’s message log (chatter) for you to review by hand. If the student already had a Main Group and you set Studies and Main Group together in the same save, their old subject enrollments are moved into the new group instead of being regenerated from the template — see “Changing a student’s main group” just above.
The same automatic placement also happens when placing a student for the first time — whether that’s while creating a brand-new student’s record, or while filling in Studies for an existing student/applicant who never had a Main Group before. Set Studies (leaving Main Group empty) and, on save, EMS auto-picks the Main Group and generates the subject enrollments from that study’s template — no extra step needed. You can also fill in Main Group yourself in the same save (the normal way of completing the Studies tab in order) — since there is no previous group to move enrollments away from, EMS still generates the subject enrollments from the template, using the Main Group you chose.
Bonifications and exemptions
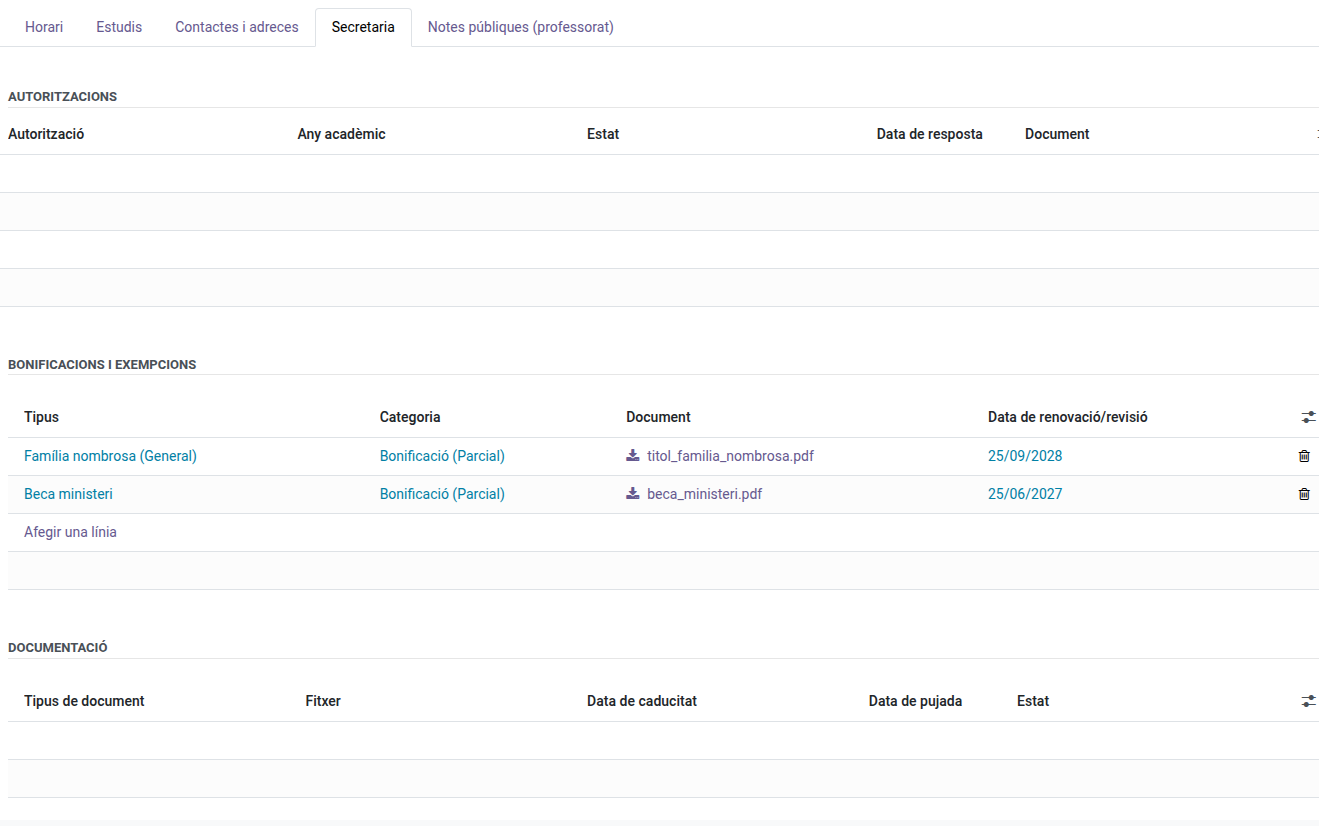
A student’s fee benefits (bonifications, which discount part of the enrollment fee, and exemptions, which waive it entirely) are registered in the Secretary tab of the student’s record:
- Add a line per benefit, choosing its type (large family, single-parent family, ministry scholarship, disability, other) and attaching the supporting document.
- The renewal/review date is pre-filled automatically (9 months for a scholarship, 2 years for the rest) but can be adjusted.
- A student’s overall Benefits badge (shown on the form) reflects the highest-priority benefit registered: an exemption always outranks a bonification.
Bonifications and exemptions are the family’s economic data: only the administrators, the secretary’s office, the Head of Studies, guidance, coexistence and the student’s tutor (with the chiefs above them) see them. Other teachers don’t see this section, only the Benefits badge at the top of the form.
Whether a benefit actually changes the enrollment fee depends on the state of the corresponding enrollment: a benefit registered before the enrollment is confirmed applies to it immediately; one registered after confirmation does not retroactively change an already-confirmed order — re-applying it explicitly (from the enrollment) is needed instead. See the enrollment’s own manual for that re-apply action.
Filters applied when you open the student list
The search bar opens with two filters already applied: Students, which hides former students, and My students, which restricts the list to the groups of whoever is logged in. Because secretariat and administration are not assigned to any group, My students does not hide anything from you — the list shows every student with it on. Remove either filter by clicking its ×.
Columns shown in the student list view
Switching the Students screen from Kanban to List view shows, by default, most of the fields already used in the centre’s official student data export (document ID/DNI-NIE, birth date, whether the student is of legal age, social security number, nationality, address and postal code), plus the four authorization badges (image rights, school trips, health data, share with family). Any column can be hidden — click the icon at the right of the column headers and untick what you don’t need; the choice is remembered for your next visit.
Fields only admin/secretary/Head of Studies/tutors can see
Personal data (the student’s address and phones, documents, birth date, medical information, special educational needs) is hidden from anyone who is neither admin, secretary, Head of Studies/Deputy Head of Studies/Director, nor the student’s own tutor. Other teachers see, read-only, both emails, the Student ID, whether the student is an adult, the benefits badge and the authorizations summary; to call home they have the family members’ phones in the Contacts & Addresses tab. Head of Studies/Deputy Head of Studies/Director have the same full access as secretary here, for any student centre-wide, not just their own tutees. A tutor can also edit the record of a student they tutor and that student’s family contacts, but sees a narrower set of editable fields than secretary/admin/Head of Studies. They can also add and remove the family contacts of the students they tutor. Guidance sees and edits the special educational needs of any student.