EMS
| Català | Castellano | English |
Enrolling the preinscription students
This guide explains, step by step, how the secretary staff processes the preinscription students (applicants granted a place) all the way to generating their enrollment proposal and sending it to the families, all from the Academic management module.
The GEDAC import brings in two kinds of students, each found in a different view:
- New students — applicants who do not belong to the centre yet. They are created as Applicant contacts.
- Current students — internal continuers who change study next year (a 4th-year ESO student granted a place in SMX, an AO student moving to GA…). They already are students, so they are not touched: only the destination GEDAC granted them is recorded.
From Step 3 on, the circuit is the same for both.
This is about applicants, from GEDAC. To refresh data for students already enrolled at the centre, from a different source system, see Importing students from Esfera (SAGA) instead.
Index
- Step 1 — Import the applicants from GEDAC
- Step 2 (new students) — Review the preinscription applicants
- Step 2 (current students) — Find the internal continuers
- Step 3 — Create the enrollment proposals
- Step 4 — Give portal access to students and families
- Step 5 — Review the generated enrollments
- Step 6 — Send the enrollment proposals
- Study changes that do not come from GEDAC
- Bonifications and exemptions approved after confirmation
- FAQ
Step 1 — Import the applicants from GEDAC
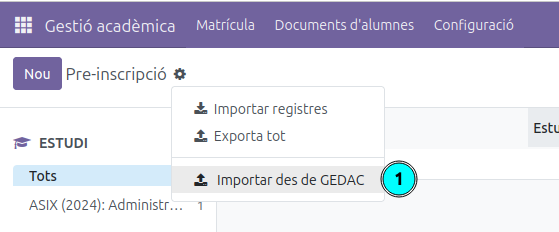
In the Preinscription view (menu Enrollment → Preinscription), open the actions menu (the gear icon ⚙️ next to the title) and choose Import from GEDAC (1).
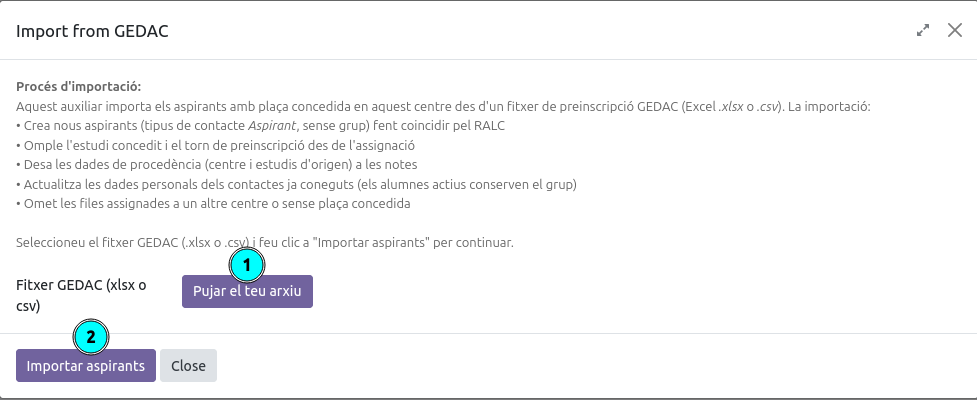
The Import from GEDAC wizard opens. This process imports the applicants granted a place at this centre from the GEDAC preinscription file (Excel .xlsx or .csv). Specifically, it:
- Creates the new applicants (contact type Applicant, with no group), matching by RALC.
- Fills in the granted study and the preinscription shift from the assignment.
- Stores the provenance data (origin centre and study) in the notes.
- For students already belonging to the centre, it does not touch their own data (name, current group, contact details): it only records the granted destination (study, shift and course).
- Skips the rows assigned to another centre or with no place granted.
To run the import:
- Click Upload your file (1) and select the GEDAC file (
.xlsxor.csv). - Press Import applicants (2).
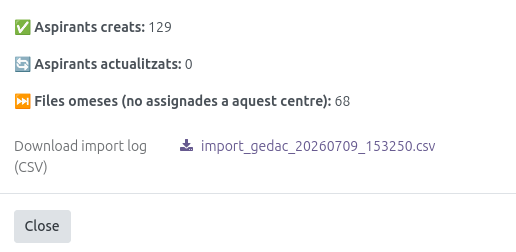
When it finishes, the wizard shows an import summary: how many applicants were created, how many were updated and how many rows were skipped. You can also download the log (CSV) and, if there are any, the gedac_alumnes_actius_<date>.csv file with the internal continuers.
If an applicant’s email in the file belongs to the centre’s own domain (a corporate account), the applicant is still created or updated, but without that email, and the summary lists a warning for them.
Step 2 (new students) — Review the preinscription applicants
New applicants appear in the Preinscription view. To review them comfortably:
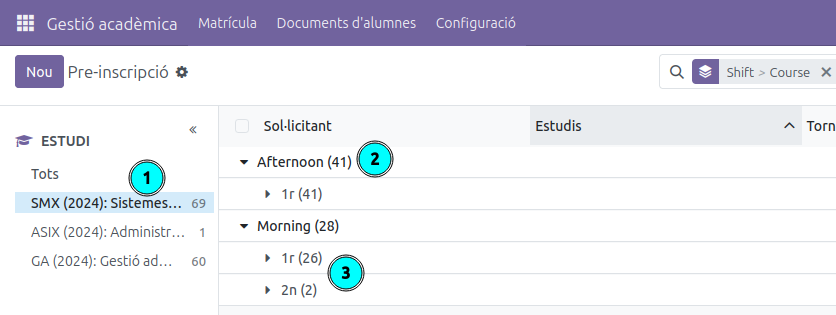
- Use the study panel on the left (1) to filter the students by study (SMX, ASIX, GA…). The number of applicants is shown next to each study.
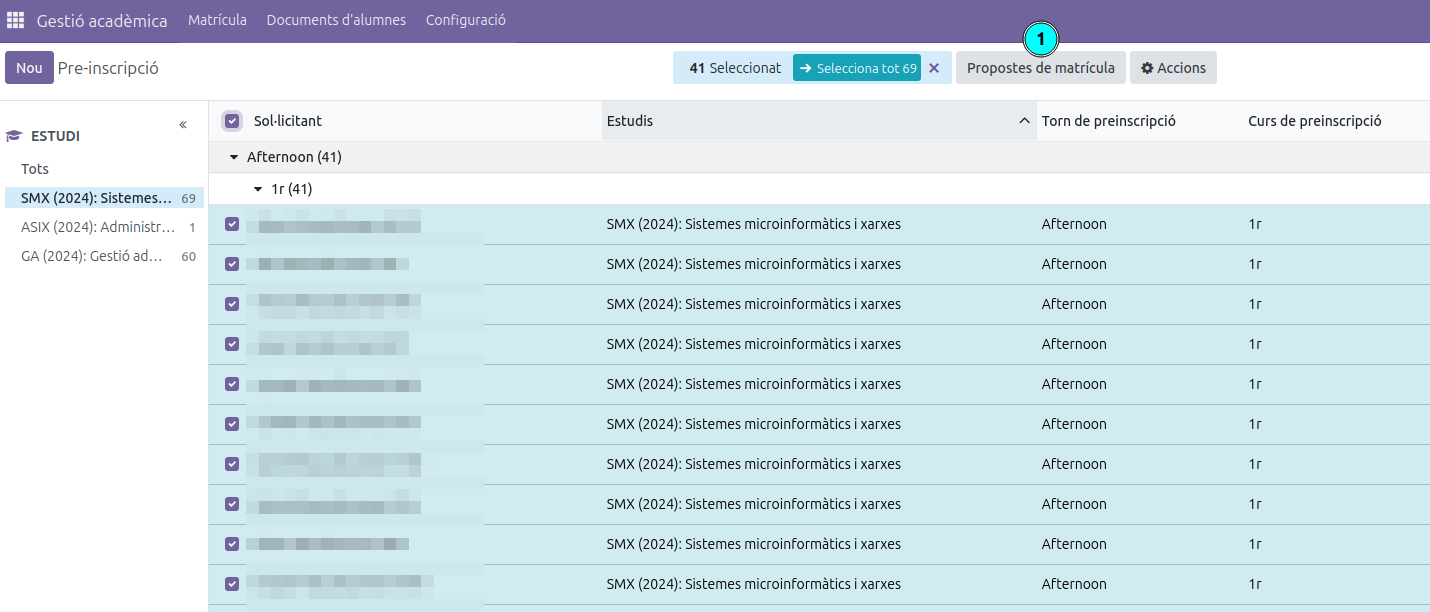
- The list comes automatically grouped by shift (Afternoon / Morning) (2) and, within each shift, by course (1st, 2nd) (3). This grouping makes applying the enrollment template simpler: each combination of study, shift and course has a default template and destination group.
Select the applicants (the header checkbox for those on the page, or Select all for the whole study) and go to Step 3.
Tip: work study by study. That way every selected applicant shares the same template.
Step 2 (current students) — Find the internal continuers
Students who already belong to the centre do not show up in Preinscription: they are still students. You will find them in Enrollment → Enrollment proposals, using the With GEDAC assignment (1) filter, which lists only those with a granted destination who are not enrolled yet.
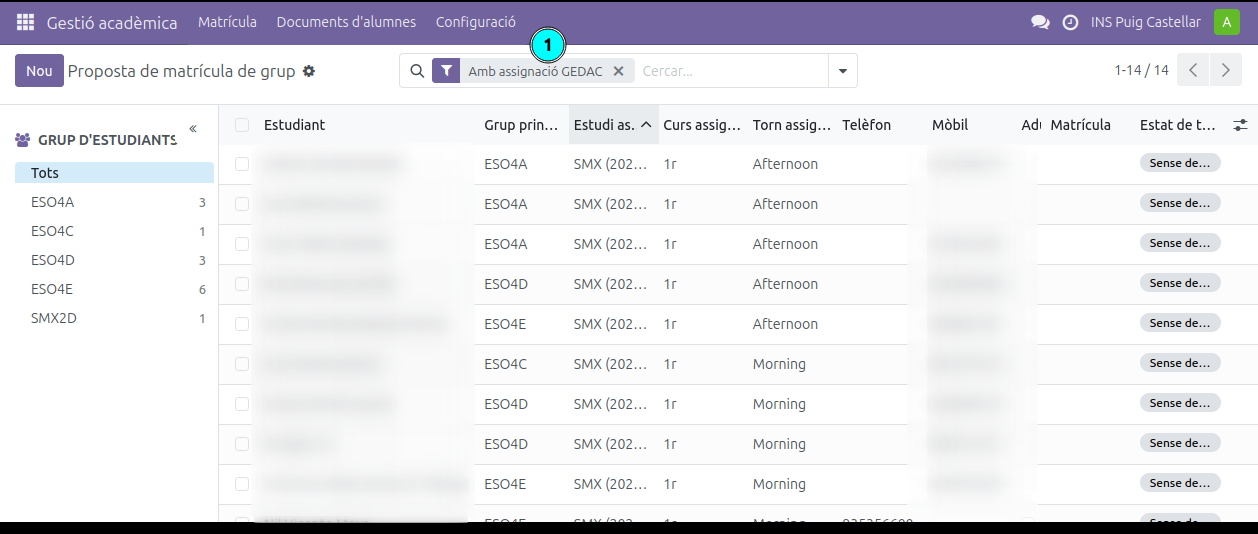
With the column selector (the sliders icon, at the far right of the list header) you can show Assigned study, Assigned course and Assigned shift, and with Group by → Assigned study you can work through them block by block (first the ones heading to GA, then the ones heading to SMX).
Tick the students heading to the same destination study and go to Step 3.
Important: do one pass per destination study. The wizard applies a single template to every selected student.
Step 3 — Create the enrollment proposals
With the students selected (whether from the new-students Step 2 or the continuers one), press the Enrollment proposal (1) button in the top bar.
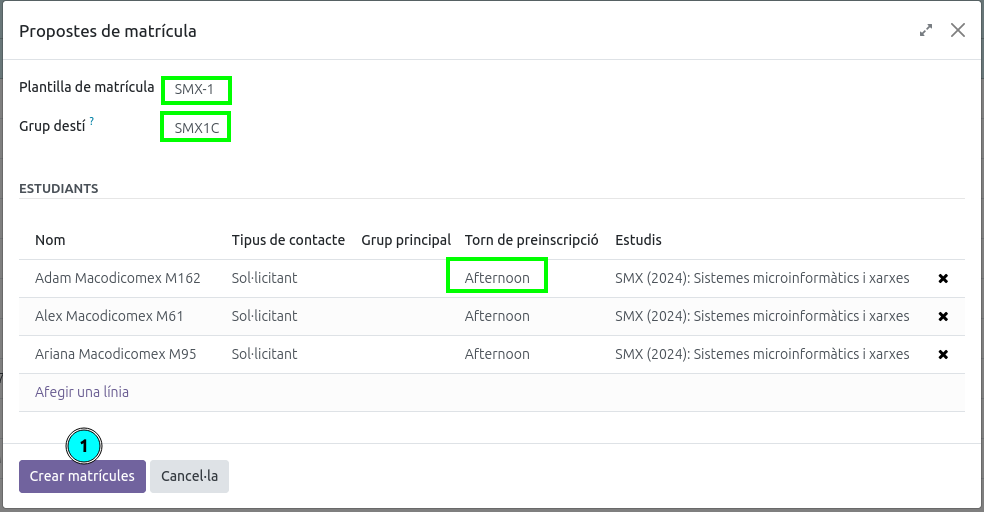
The Enrollment proposal wizard opens, already filled in from the preinscription data:
- Enrollment template — the one for the granted course (e.g. SMX-1). For continuers, the one of the destination study, not of their current one.
- Destination group — the first group of the granted course and shift (e.g. SMX1C). You can keep it or change it; if you leave it empty, each student gets their own suggested group.
- Students — the selected list. You can remove one with the cross on the right.
Check that everything is correct and press Create enrollments (1).
Why doesn’t a continuer’s suggested group keep their current group’s letter? Because across different studies it means nothing: an ESO4E student has no SMX1E to land in. The system treats it as a new entry and suggests the first free group of the granted shift. You can change it if you want to distribute them differently.
This action creates a (draft) enrollment for each student, with the given study, course and destination group. Nothing is sent to the families yet: that happens in Step 6.
When a continuer’s enrollment is confirmed, the GEDAC assignment is considered spent and the student drops out of the filter: that way the filter always shows only those still pending.
Step 4 — Give portal access to students and families
For the families to be able to confirm the enrollment later, they need portal access. From the Preinscription view, with the applicants selected, open the Actions menu and choose Portal access (students/families) (1).
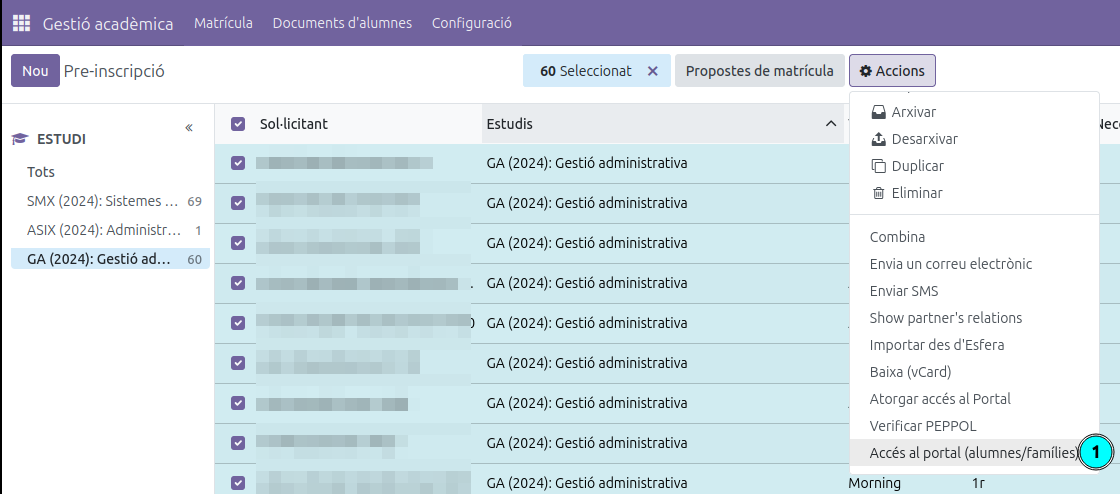
This option generates or activates the educational portal access for the students and their families, so that when they receive the proposal email they can log in to answer the authorizations and confirm the enrollment. Students already belonging to the centre usually have it active.
A minor student also receives their own access, next to the family’s, but it is view-only (schedule, their communications and profile): the family is the one who confirms the enrollment. See How to manage portal access.
Step 5 — Review the generated enrollments
The enrollments created in Step 3 are in the Enrollment → Enrollments (1) view. To see only the ones not sent yet, apply the Not sent (2) filter (it shows the enrollments in draft state).
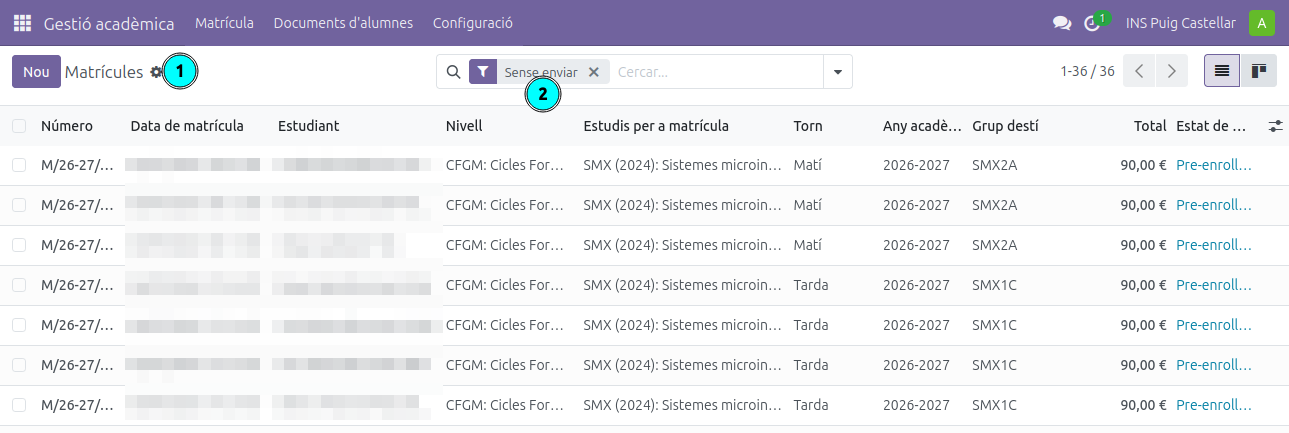
In the list you can check, for each enrollment, the student, the level and the study, the shift, the academic year, the destination group, the total amount and the state.
The available filters are Not sent (drafts), Not confirmed (drafts and sent), Confirmed and Cancelled.
Step 6 — Send the enrollment proposals
Once the enrollments are reviewed, select the ones you want to send by ticking their checkboxes (1). The Send enrollment (2) button appears at the top; press it.
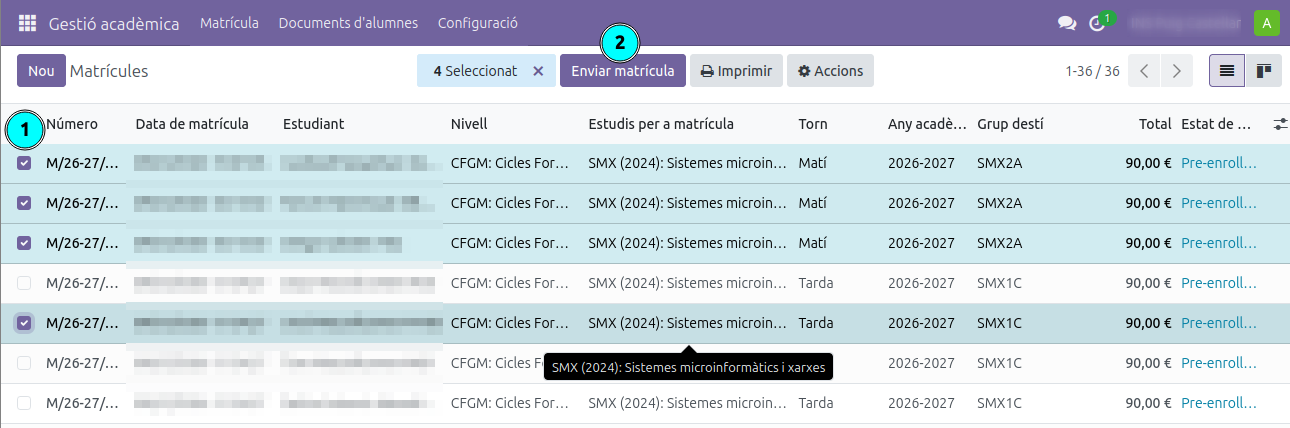
Pressing Send enrollment does the following for each selected enrollment:
- The enrollment proposal email is sent to the student/family (with the centre’s template).
- The enrollment moves to the sent state.
- If the student had left the centre in a previous course (a withdrawal or a graduate), they become an applicant again and are unarchived, so they can be granted portal access and confirm the enrollment themselves. An expelled student is not reinstated.
From here on, the families receive the email and can confirm the enrollment from the portal by following the Guide to confirm the enrollment proposal.
Study changes that do not come from GEDAC
If a student changes study outside the preinscription (e.g. asking in October to move from SMX to GA), they have no GEDAC assignment and the system cannot suggest anything.
In that case, tick the Enroll in a different study checkbox in the proposal wizard: the Enrollment template dropdown stops filtering and lists every template of the centre. Pick the template and the Destination group by hand, with the right shift (the enrollment’s shift is taken from the group you pick).
The checkbox is only visible to secretary and academic administration. Tutors keep proposing their students’ renewals within the same study: a tutor spotting a student who must change study has to tell the secretary.
Bonifications and exemptions approved after confirmation
When a student’s fee bonification or exemption document is approved, the discount is automatically applied only to enrollments still in draft. Already confirmed enrollments are frozen: neither the lines nor the total change, because the invoice has already been issued with the original amounts. This way, what the student sees on the portal always matches the invoice.
If the student was entitled to the benefit but uploaded it and it was approved after confirming the enrollment, it must be applied explicitly:
- Open the student’s confirmed enrollment.
- Click the Re-apply Benefits button (1) in the header.
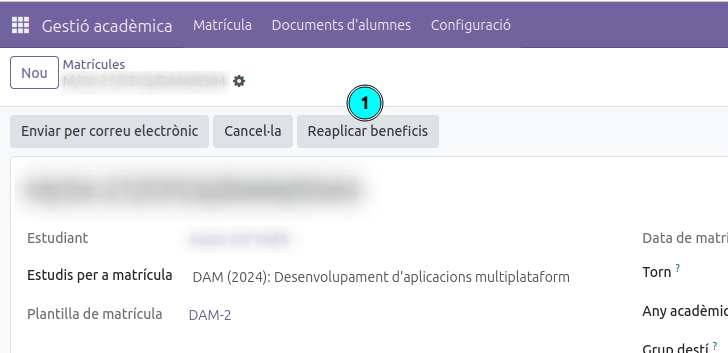
- Confirm the warning by clicking Ok.
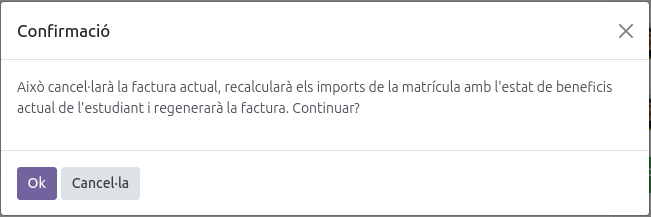
- The system cancels the issued invoice, recomputes the fee lines with the student’s current benefit status and generates and posts a new invoice. The operation is logged in the enrollment chatter.
If the invoice already has payments registered, the button is blocked with an error: in that case a credit note must be issued manually from Accounting.
Registered payments are visible in the portal
When you register the payment of an installment of an enrollment invoice (from Accounting, or through the SEPA batch), the family’s portal updates on its own:
- In the Enrollment section, inside the Payment block, the installment goes from Pending to Paid. With a two-installment plan, each installment has its own status.
- In the Communications block of that same page, and in the portal’s Communications section, a notice appears with the installment collected, the amount and the due date.
This is how the family sees the payment schedule in their portal:
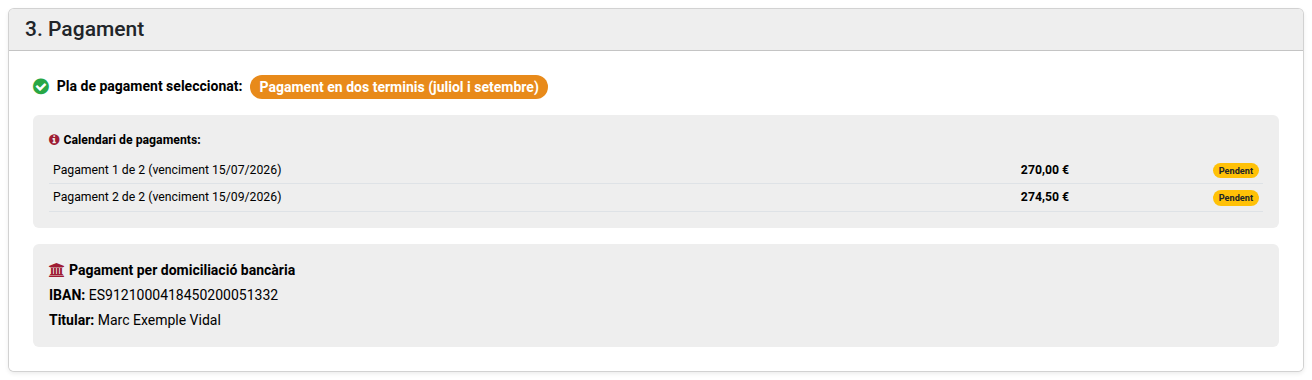
The notice is not emailed: it is only published in the portal. A partial payment of an installment neither marks it as paid nor produces a notice; the installment has to be covered in full.
FAQ
The “With GEDAC assignment” filter shows no students. Either this year’s GEDAC import has not been run yet, or they have all been enrolled already (on confirmation, the student drops out of the filter).
The suggested group or shift is not the right one. Change them in the wizard before creating the enrollments. The suggestion is a starting point, not an imposition.
I picked the wrong template and already created the enrollments. Open each draft enrollment and change its study, or cancel it and start over. While the enrollment is cancelled, the student shows up in the filter again.
The student is still listed in their old group. That is correct. They do not change group until the enrollment is confirmed and the course transition is run. The Destination group you picked is stored on the enrollment.